If you have had trouble understanding White Balance, the links below should help you get a better grip on what is going on. The first article by Graphics simplifies White Balance a little better.
White Balance can be just as confusing as understanding Aperture as it can look as if everything is working back to front.
A higher Kelvin number e.g. 10 000k is more blue whereas a lower Kelvin number e.g. 2500k is more red.
When you take a photo and it appears too blue/cold, you increase the Kelvin number and it adds in more red. The same goes for a warm photo that has too much red so you decrease the Kelvin number to add more blue.
Ha? White Balance works in reverse like Aperture. When you increase the Kelvin number the camera is reading the white balance as having more blue than red so it compensates and adds more red.
WB selection and changing of presets is not available in Auto, Lens Priority and Smart Mode.
The automatic options are represented as Auto WB (the camera chooses), Daylight, Cloudy, Flourescent, Flourescent NW, Flourescent Daylight, Tungsten and Flash. Followed by customary options Custom Set and Colour Temperature (where you dial in the Kelvin number you want).
To access WB:
Via the Menu Button - Select Menu, under Camera icon menu on the left scroll down until you get to White Balance, select and then select one of the WB options.
Via Fn Button - Click Fn button, scroll down to the WB menu option, it will be the third row from the top.
You can adjust the WB presets by scrolling to the preset and then pressing the DISP button (up button for this selection) and move the selection tool around e.g. say you want to add more green and blue, move the selection up and to the left.
After you have changed the preset it will show up on the right side of the screen next to the WB symbol selected e.g. if you selected Cloudy, a cloud will show with the letters, B, G, M or A (A is yellow) or a combination of two letters in their colours (B is blue etc).
This doesn't make a new preset but changes the current one however you easily just change it back to the original by using the Reset button or moving the selection to the center dot where the two lines intersect.
For Custom Set, you need to take a measure of the white balance either with a grey or white area. Select Custom Balance (just scroll until it's highlighted) then press DISP (up button).
There will be a grey box in the center, hold this over an area of white or grey then click/screen touch Measure. The camera will click as if taking a photo but is only taking a measure, you won't find any photos in your review.
Once a measure has been taken the camera will go back to the Live view screen. Custom Set will be selected as the WB and the measure it took will be used. That won't change unless you take another measure or change the WB to another setting.
For Kelvin Colour Temperature, here you set the temp according to a number from 2500K (will add more blue) to 10 000K (will add more red). Select Color Temperature (has a big K) then press DISP to change the temp.
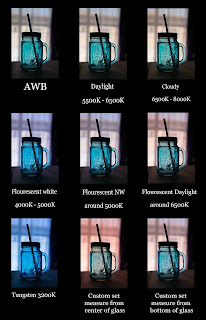
Below are some sample photos.
The first (and not so glamorous) Jelly Bean photos were taken indoors under a fluorescent energy saving bulb, 14w, cool white (but more an off white colour). I included a sack material, which is a light brown, colourful Jelly Beans and used my Grey Card for the background of the sweets.
AWB and Custom Set were more accurate where Custom Set was measured from the Grey Card. I included the highest and lowest in the Color Temperature (Kelvin Temp).
Taken inside using natural light from a window behind the mason jar. For Custom Set one measure was taken from the center of the jar and the second from below the jar.
Desert Rose - taken outside in the shade of a tree with sun just past midday. I used my grey card for the Custom Set, as you can see there is more green in the custom measure than in AWB. Daylight was a little more closer to what I saw as it contains a warmer cast than AWB.
As you will have noticed I didn't play with the Flash WB. Balancing ambient light and flash is a whole other ballgame, especially when you are stuck with the "internal" flash. So for now that will be left for another post.
Ok that's about it for this post. Check out the articles below, they should help clear up a few things and have some great info.
Understanding White Balance
Bob Atkins
Fstoppers
Cambridge in Colour
Exposure Guide


No comments:
Post a Comment