Powered By Blogger
Showing posts with label tutorial. Show all posts

Monday, July 21, 2014

Samsung NX300 - Quick Shutter Speed Tutorial

Shutter Speed shooting mode is exactly what it says and for speed shots this is the favoured shooting mode by many.

Before going into this tutorial I would suggest taking a look at the Program Tutorial and Aperture Priority Tutorial.  I know it sounds irritating but my reasoning is because I have explained settings and so on in further detail.  It also means I don't have to keep on repeating the info.

With Aperture Priority, the f number was controlled by you and the shutter speed adjusted by the camera.  But in Shutter Speed, the roles are reversed and you control the shutter speed while the camera adjusts the aperture.  Another reason why I wanted you to check out the Aperture Tutorial first.

As always, just selecting a shutter speed and shooting won't get you the photos you want.  In order to maintain what the camera believes is correct exposure it needs to compensate by opening the aperture blades wider to allow more light in (the smaller the f number the more light but less is in focus).  So you can lose out on depth of field (what is kept in focus).  That is why you also need to keep an eye on the f number while changing the shutter speed.

Also if the shutter speed e.g. 1/2000 shows as red instead of blue, then exposure is incorrect and the photo will be dark.  The shutter speed number needs to remain in blue and the slightest shift in light can change this so don't neglect the shutter speed in anyway.

You may want to push it and increase the shutter speed to what you want, underexposing the photo and then use Exposure Compensation to lighten the photo.  Give it a try and compare to a correctly exposed photo.  Noise will increase greatly and you may only be allowed to add a certain amount of Exposure Compensation.  It will look terrible so I wouldn't recommend trying this out.

To increase the camera's sensitivity to light and therefore increase the shutter speed you can increase the ISO.  I'd say 800 is the highest you can safely go without too much noise although up 1600 can work but higher and you get visible noise in the background.

I haven't had much of a chance to travel and would have loved to get some speeding bike action in but used Newton's Cradle Balance Balls for this tutorial.

You can use anything with movement e.g. toy car, pinwheel, water etc.  A simple experiment is to half fill a glass or jar of water, add glitter and stir.  While the water is moving take a photo looking down on the glass/jar.

Ok, let's get started.

1. Switch on the Samsung Nx300 and turn the shooting mode dial to S (in between the A and M).  Don't confuse it with the Smart Mode small S in a black camera silhouette.

2. Quick check of the settings:
Autoshare - on or off is your choice, I keep it Off.
Photo size - 20M 5472 x 3648 (this will be greyed out if RAW is selected under Quality)
Quality - I usually use RAW but for the tut I changed to JPEG Super Fine
ISO - start at 100, avoid using Auto
White Balance - set for now to AWB
Picture Wizard - for now keep this Off, I will later go through each setting
AF Mode - Single AF
AF Area - Multi AF
Touch AF - Touch AF
MF Assist - Enlarge x5
Framing Mode - Off
Drive - High
Metering - Multi
Dynamic Range - Off
Flash - won't be using flash for this tutorial, so don't worry about this setting.

3.  As mentioned above, watch both the Shutter Speed number (e.g. 1/200) and the Aperture (e.g. f4). The shutter speed number needs to remain blue to keep correct exposure.  Depending on your light available, the higher the shutter speed goes the wider the aperture (smaller the number) becomes.  In shaded areas the shutter speed might not go higher than 1/200 and aperture may be the widest the lens allows f2 (depending on the lens).

This means that while you may have a fairly fast shutter speed the area in focus will be very small and there will still be a chance of blur.

Before moving to Step 4 I want to show you examples of how changing the ISO and Shutter Speed in turn changes the Aperture.

The photos haven't been edited other than to make smaller for the blog.

Here are examples in a shaded area and direct sun to give you an idea before taking the shot.  I have also included 100% crops of two of the photos to show you the noise levels:


The highest shutter speed I could get while keeping correct exposure was 1/200 at ISO 100 but this meant the aperture was f2, decreasing how much was in focus.  Also, I used Continuous Drive and captured 4 photos, of which the last one showed the moving ball as being blurred.  So the speed was ok for 3/4 photos but that 4th may have been important in another situation so the speed wasn't as fast as it should have been.

You can also see that the depth of field was shallow so only the balls (and anything at the same distance) were in focus as this was where I touched the screen to place focus.

I increased the ISO in the photo below to 400, so the highest shutter speed allowed was 1/640 with a slight increase in the aperture f2.5.


Now that the shutter speed has increased I can play around with the setting to increase the aperture.


To increase the aperture to f4 and get more in focus I had to decrease to 1/200 but as you can see the slower shutter speed didn't capture the photo fast enough.  If I wanted to I could increase the ISO to 800 which would increase the shutter speed fast enough to capture the shot clearly.

In direct sunlight I reached a shutter speed of 1/6000 with aperture f2.8 on ISO 400.  Each photo taken in direct sunlight with ISO 100-400 produced shutter speeds over 1/2000, which was fast enough for clear shots.


The high shutter speed gave me room to play and I was able to get a clear shot with ISO 400, aperture f8 and by decreasing the shutter speed to 1/640.

If you are taking a photo of a bird in flight or a plane against a bright blue sky then you will be able to achieve a shutter speed of over 1/3000 with aperture f8 and up.  As said before, it depends on your lighting.

4. Once you have found the correct settings depending on your lighting, press the shutter half way to focus and touch the screen if you want to place the focus elsewhere.  Once you are happy with the focus, press fully to take a photo.

5. Sometimes the camera doesn't always get the exposure right so you can use the Exposure Compensation to make the photo darker or lighter.  Go to Program Tutorial and scroll down to where the article says But what happens if the photo appears too dark?  

ISO, Shutter Speed and Aperture all work together besides the influence of light.  It might sound complicated but if you just pay attention to the Shutter Speed and Aperture, then it's more than a good start.  Unlike Manual Mode the Program, Aperture Priority and Shutter Priority mode have settings where the camera acts as an assistant.

It's why I always suggest starting with Program mode. The camera still has more control than you do in Program mode but you can still decide on the combination of settings although limited.  When you move onto Aperture or Shutter Priority the camera hands over the reigns of one of the settings i.e. full control over shutter or aperture.  

As you move through these shooting modes, you choose what suits you best or use each one for different modes.  Aperture was my favourite until I tried Manual and have stayed there ever since.  But I only reached manual by going through each mode and learning what works where.  Some will tell you to go straight to Manual, and if you want to why not?  But if it seems to much for a first go, just start at the beginning and work your way through.

Sunday, June 1, 2014

Samsung NX300: Aperture Priority Quick Tutorial

Unlike my previous posting, this one will in fact be a quick tutorial because I won't be discussing the settings.  I kept the settings the same as in Tutorial In Program Mode so you can refer to that page for further info.

If you are new to the advanced modes of an SLR, I would strongly suggest trying out the tutorial mentioned above in Program Mode first.

Aperture Priority, as discussed in Aperture Priority Mode, allows you to take control of the aperture (f number) with the camera adjusting the shutter speed accordingly.  If aperture has had you stumped then hopefully this article will help you understand it more.  Aperture Priority was originally my favourite mode before turning to Manual.

Take a look at my previous article on using Program Mode and pay attention to the photos showing apertures f2, f10 and f22.  The photos give you an understanding of what aperture is about and how changing the f number changes the amount that is in focus.

A smaller f number (large aperture) allows more light in but only a small area (where the focus is placed) is in focus. A larger f number (small aperture) decreases the amount of light allowed in but more of the photo is in focus.

This article will help with the more technical side: http://digital-photography-school.com/aperture/

For this tutorial I'm going to be working on a photo indoors for a low light example and outdoors. Give both a try to get a feel of how shutter speed, aperture and ISO work together.

Aperture Priority Quick Tutorial

1. Switch the camera on and turn the mode dial to A.  Take note of the f number at the bottom.  You will be able to change this using the Jog Dial on the top of your camera.  Turning the wheel to the left decreases the f number (opening the lens up) and turning to the right increases the f number (closing down the lens).  The f number must remain in the colour blue for correct exposure, if red the camera won't take a photo.

2. Check the settings.  Have a look at Tutorial In Program Mode for the settings and explanations.  I have kept my settings the same as for Program Mode.

3. Indoor photo - the amount of light e.g. near a window, will determine the shutter speed and the ISO if you specifically want a certain aperture.  As it is currently going into Winter in South Africa, my work room isn't getting as much light as usual.

I chose the largest aperture for my Samsung 30mm, which is f2, for the camera photo.  The largest apertures for the following Samsung lenses: 18-55mm is f3.5, 20mm is f2.8, 20-50mm is f3.5, 50-200mm is f4.

So whichever lens you have, turn the Jog Dial to the left until you get to the smallest f number (largest aperture).  We are going to start from here.

4. Half press the shutter button to focus and take a look at the shutter speed.  The camera will meter and adjust the shutter speed according to the aperture you chose and the amount of light available.  If the shutter speed is below 1/30 then you will need to boost up your ISO.  You can always just change the aperture but you should practice with different apertures, starting at the largest, to get an understanding of how this works.

5. If your shutter speed is below 1/30, then press the Fn button and use the navigations buttons to move the blue outline to select ISO.  Click OK (or touch the screen) and use the navigation button on the right (AF button) to select a higher ISO.  If you started with ISO 100, increase to 200 and see if this has improved your speed (it should have doubled or around there).  If ISO 200 is not enough increase to 400 and so on.  You want to get the shutter speed to around 1/50 or more but be careful of pushing your ISO unnecessarily high.  Press Ok once you have selected your ISO.

Another thing to note, the further the subject/object is away from the focus area the more blurred it will be and anything at the same distance will be in focus.

In my test shot, because of the light, the shutter speed for f2 was at 1/15 with ISO 100.  I increased my ISO to 400 which pushed the shutter speed up to 1/60 while keeping my aperture at f2.

The focus was placed at the top and anything level with the focus was also in focus.  The background was blurred out at f2.

6. Now increase your aperture (f number) to f10.  In low light you will immediately see the shutter speed slow down greatly.  You can see from my test shots below that I to use a tripod and timer.  To use the timer, press the left navigation button to select the Driver and then use the navigation button on the right to move the selection box to Timer.  To change the length of time, press the DISP (top navigation button) to change.  Once done press OK.

When you have selected focus and press the shutter button down to take a photo, step back and let the timer do its work.

In the photo below, when I selected f10, ISO 400, the shutter speed slowed down to 0.4" (4 seconds). At ISO 800, shutter speed was 1/5 and so on.  I increased my ISO to 6400 which gave a shutter speed of 1/40 at f10.  Just enough for handheld but as shown below, the noise became evident.

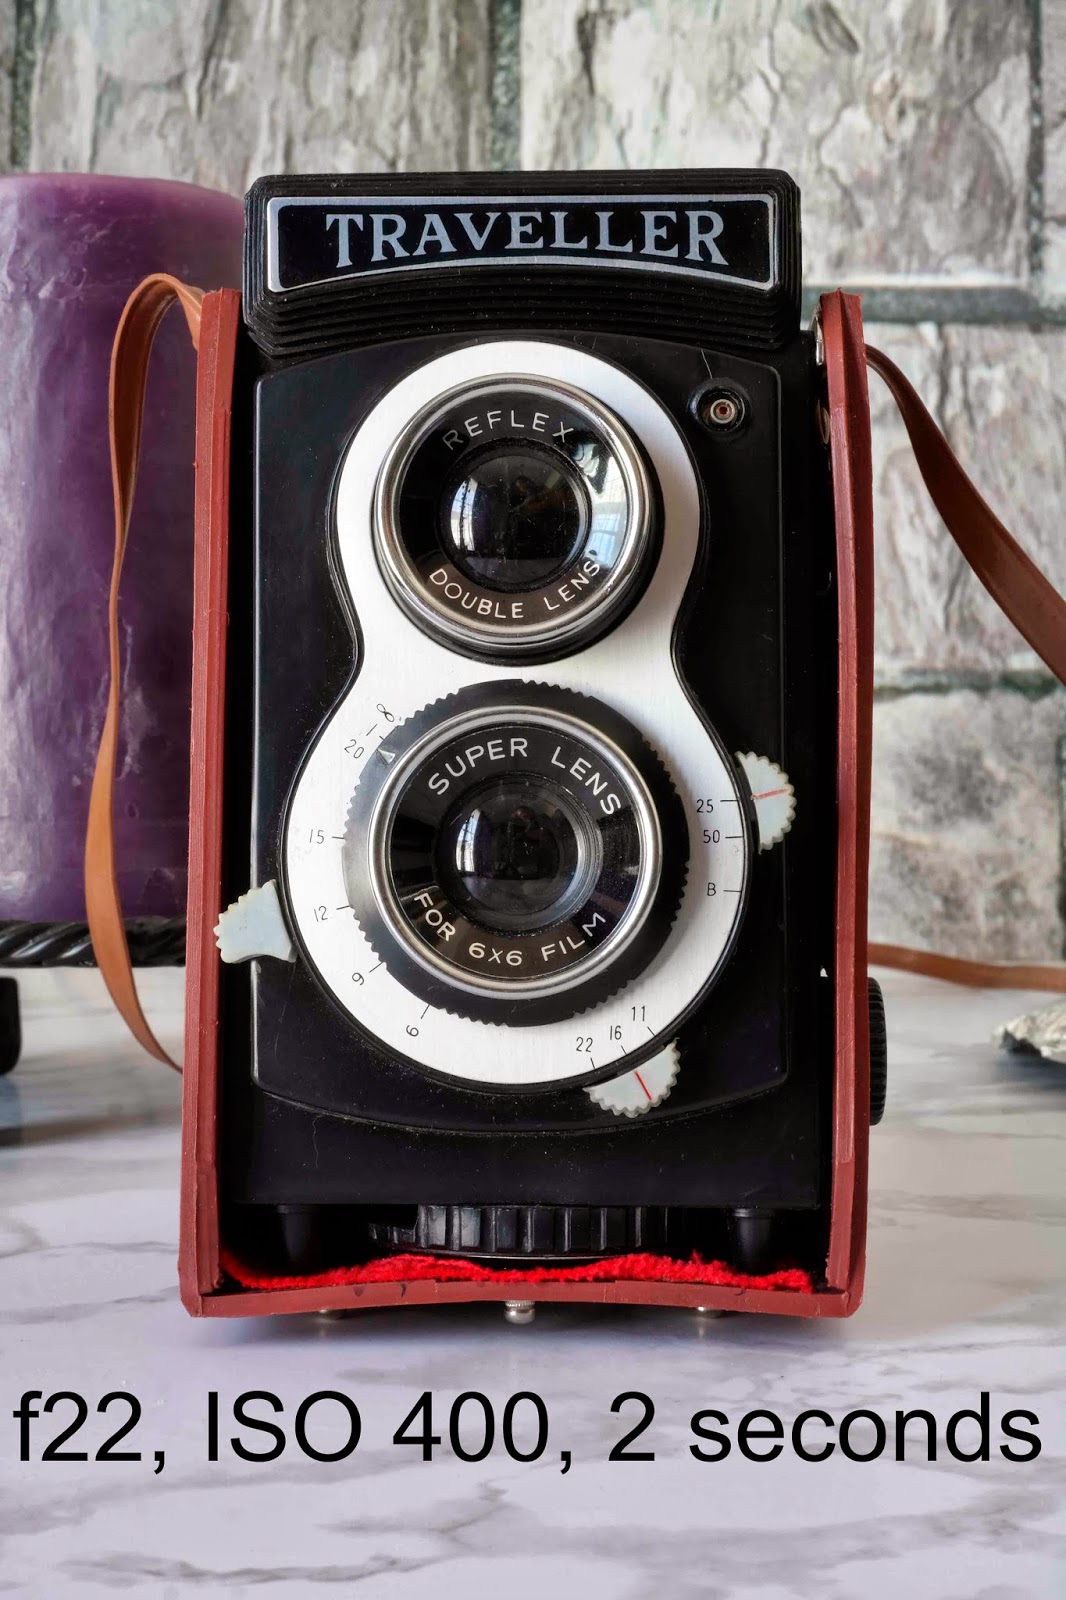
I used a tripod here (you can use anything that provides stability, even a box), decreased my ISO down to 400, set the timer to 5 seconds and took the shot.  I focused on the same area as in f2.  You can see that the background is less blurred and the object (the purple candle) behind the camera is also more in focus.

7. Change your aperture to f22, the shutter speed should slow down even further than f10 at the same ISO.  Choosing f22 decreased the amount of light allowed in so much that at ISO 400 the shutter speed was 2 seconds. That might not sound slow but is too slow for handheld and definitely slower than 0.4 seconds.  I had to use a tripod or risk extremely high ISO and noise and even then the speed wouldn't haven't been fast enough for handheld.

Front to back the photo is sharp in comparison to f2.

That's it for the indoors photos.  The less light you have the slower the shutter speed depending on what your aperture is.

Next, outdoor photos test shots.

The steps I followed are the same as above.  As I had more light outside I didn't have to increase my ISO drastically but I did have to go as high as 1600 for f22 because I was in the shade.

So start out with the your largest aperture (smallest f number) and increase your ISO accordingly.  If your ISO has to go higher than 1600 to get a shutter speed of 1/30 and over, then use a tripod and decrease your ISO down to around 400.  Use the timer on your NX300.  If there is wind outside and the object/subject is light then you will have blurring if the wind causes the object to move e.g. a flower will move with the wind and you will need a faster shutter speed of about 1/80.


When you change your aperture to a bigger f number (smaller aperture) you might not see a difference in comparison to a larger aperture on the screen.  To see what will be in focus and what will be blurred before taking a photo, press the Delete button.  This button can be customised but factory settings should be set to Depth of Field.

The photo example below is just to show how the amount of light changes shutter and ISO when the aperture is f22.  Same day, same time (morning) as above outdoor photos but more in the path of the sun.

Here the ISO was 400, shutter speed 1/40 in sunlight whereas the previous photo was taken in the shade causing ISO to increase to 1600 just to get a shutter speed of 1/30.

Now, let's have a quick look at angle.  With the photos above, the shots were taken straight on.  As said, anything at the same distance of the area focused will also be in focus.

Both photos were taken with the following settings: f2, ISO 400, 1/80 shutter speed.  The only difference is the angle, which shows that the further away something is from the focus area the more it will blur.  The focus was also placed in exactly the same area.

The photo isn't 100% straight on as you can see.  The right side is more blurred than the left, the bottom sharper than the top.  So I was at a bit of an angle lol.

Here I positioned the Samsung NX300 slightly higher, looking down on the camera.  The lower part of the camera was further away than the focused area because of the angle and so is out of focus.

If I had used f22, then the bottom half would have been sharper and clearer (although might have shown a slight blur).  Also, changing angle can change how the light hits the object/subject and increase/decrease your shutter speed.

When to use a large aperture (small f number) and small aperture (large f number)?  Anytime, anywhere although a larger aperture (small f number) is more beneficial for low light scenes because it pulls in more light but less will be in focus. 

There isn't a rule that says you must use this setting for that scene and so on.  If you want the attention on something specific then use a larger aperture (small f number) like f2.  If you want focus front to back then start with f8 and work up. Always keep a check on the shutter speed, a steady hand can get away with a slower shutter speed to a point and if you intend on trying handheld use continuous shooting.  

Depth of field (how much is in focus) is a matter of taste and playing around with the aperture will help you understand how it all works.

Tuesday, May 20, 2014

Samsung NX300: Starting out with a quick tutorial in Program Mode

Anyone new to SLRs wants to know how to use the non-automatic shooting modes.  So here's a quick and basic tutorial to get you started.  Basic in the terms that there are so many settings but I am sticking with the general so that you can get an idea and start taking photos.

Do this tutorial during the day, with sufficient light e.g. outdoors.  Choose anything, a bench, a stone, a leaf, but make certain that what you choose doesn't move.  If you experience a rainy or overcast day, read through the instructions and the info at the end of the article.  Try and avoid direct sunlight as this can cause blown highlights and create harsh light.

Ok I cheated here, this is a moving subject/object because it's extended and there was wind.  I held the flower stem with my one hand and took the photo with the other.


I'm not good with videos but will try and put one up.  In the meantime, here's a written version.

Tutorial using Program Mode

Step 1. Make certain your battery(s) are charged, no not a joke because the last thing you want are dead batteries with the only option of charging putting your camera out of action for a few hours. Have extra batteries because the screen will drain them quickly.

Step 2.  Switch your Samsung NX300 on and turn the Mode Dial (refer to the descriptions of your manual if not certain) to P for Program.


Step 3. Before taking a photo you need to check your settings first:
Select Menu and by using the navigation buttons scroll down to select the settings below (will be highlighted in blue), press ok or the right navigation button to open the setting:

Autoshare - I keep this off, you can turn it on later but for this tutorial you don't need to worry about it so leave it off

Photo size - choose size at the highest quality for the best result, 20M (5472 x 3648).  If this option is greyed out it means the Quality has been set to RAW. To change this scroll down to the Quality setting (right beneath Photo Size) and choose Super Fine (which is JPEG).

Quality - Set this to Super Fine as RAW is a bit more complicated.  Good thing about JPEG is that the processing is done in camera, removing artifacts and fringing but you have less information to work with.

ISO - set this to 100 (the lowest setting on the NX300).  Since you will be taking the photo during the day and will have enough light (unless it is overcast but can still be done), you want to keep your ISO as low as possible.  Higher ISO helps to capture more light in a low lit area or overcast day but brings in more noise.  For those experience rainy/overcast days, read to the end about increasing your ISO.

White Balance - later on, as you learn about aperture, shutter speed etc, you will learn about adjusting White Balance and how certain lighting e.g. Halogen Bulbs (some give a yellowish colour cast) can be corrected by changing your white balance.  But for now, leave on AWB (Auto White Balance).

Picture Wizard - leave this Off, it's more for effects as seen in examples below but right now you just want to learn how to take a photo.

Examples of the effects:
Classic

Cool

Retro

AF Mode - Set this to Single Autofocus (AF), which is used for static or still objects/subjects.  With this setting you press the shutter button half way to focus (or touch screen to place focus where you want) then all way to take a photo.  Thing is, if you or your object/subject moves then it/they move out of focus.  You could use Continuous AF which refocuses when it senses the object/subject has moved but for this tutorial set to Single AF.  Manual AF works without the aid of the camera to focus.

AF Area - Set to Multi-AF (selection is by camera whereas Single AF is by the user).  Single AF allows you to select the focus areas but you can still do that with Multi-AF by touching the screen over the area you want to focus on.

Touch AF - Set to Touch AF, which allows you to touch the area you want in focus.  You can also use Tracking AF if your subject/object moves but for this tutorial your subject/object is static.  One Touch Shot eliminates the need to press the shutter button half way and take a photo.  You simply touch the screen where you want the focus and the camera will focus and take a shot.  But for now set to Touch AF.

MF Assist - Meant for manual and fine tuning so either leave this as Off or on Enlarge x5 in case you want to try out manual focusing later on.  I find x5 is enough magnification although you can increase that amount from the options given.

Focus Peaking - Leave this as Off because it's used with manual focusing.

Framing Mode - I prefer to leave this as Off while taking photos during the day.  It would be the equivalent of an Electronic View Finder in Off mode where the screen shows what the camera sees. This means you can see what the exposure is whereas in On mode the camera adjusts the brightness of the screen according to the lighting (if you are in a dark room, it will adjust so you can see what is going on).  But I find it misleading because you can forget that what you are seeing on the screen is not the correct exposure.

Drive - I like to leave this on Continuous High, which makes use of the 8.6 frames per second. Continuous because I like the choice of being able to take one shot or multiple shots.  With Single Shot you can only take one photo at a time.  With Continuous High, depending on how long you hold the shutter button down (and the shutter speed), you can take one or multiple shots.  Continuous Normal only makes use of 5 frames per second (most likely to make clearing the buffer faster).
Just a word of advice, don't hold your shutter button in too long (2-4 shots is good enough) else the buffer fills up and takes time to write to the card.
Burst takes 10 photos per second.  Great for intense action shots but not so great if you want to immediately take more shots afterwards.  It takes about 10 seconds for the buffer to clear after the burst, so use only if you don't need to have the camera ready straight after taking shots.
Timer, AE/WB/P Wiz Bracket are a little more intense and will be discussed later.  Again, as I said, right now you just want to know how to use the Samsung NX300.
So set this to Continuous High.

Metering - Set to Multi which will average the overall brightness of the area.  Spot takes readings of the center (good for backlit subjects/objects) and Center Weighted (good for when there is a difference in lighting between background and foreground) works around Spot.  For now, use Multi.

Dynamic Range - I leave this Off because the lowest ISO allowed is 200 but helps with the loss of detail.  HDR is not available when Continuous Drive is selected, you have to change this to Single Shot in order to use HDR.  For now leave this Off.

Flash - Flash can be used in daylight as a fill flash but leave it off for now.

Step 4.  Now that you have checked your settings let's just get a few points out the way and then start shooting.

Step 5. Choose your object/subject, compose (position how you want the photo to look) and half press the shutter button.  Pay attention to the Aperture number (f number) and the Shutter Speed (something like 1/50 or 1" and to the left of the f number).

The camera will generally choose the settings and you can change the Aperture which will cause the camera to adjust the Shutter Speed accordingly.  Both numbers must stay in the green (green line beneath each) for correct exposure to be achieved.
To change the Aperture (which changes the Shutter Speed), turn the Jog Dial (refer to manual for visual description) on the top.


It has a square on the left side and a magnifying glass on the right.  While turning keep an eye on both numbers until you get the f number to f10.  We are going to start with f10 for the tutorial but in order to lock this you have to half press the shutter button or else the camera will start choosing again.

Step 6 - If the focus isn't where you want it, quickly touch the area on the screen, turn the Jog Dial again to F10 if it has changed (but most likely the NX300 will give you enough time so you may not have to use the Jog Dial) and half press the shutter button to lock everything and all the way down to take a photo.  Remember, don't hold down too long if Drive is set to Continuous High as the camera will carry on taking photos up to the limit (and then slow down) as long as the shutter button is held down.  Learn to get a feel of how long to hold down as the Samsung NX300 responds extremely fast and well.  So you need to know when to let go lol.

On a sunny day the shutter speed should be over 1/50 but if below that you may need a tripod although you can try handheld at as low as 1/30.  Read at the end of the article about what to do on an overcast or rainy day.

Take a photo and check if the lighting is correct, sharpness etc.  If not, try again, refocusing where you want with f10 selected.  If the lighting is too low causing the camera to choose a slower shutter speed because of the aperture, increase your ISO to about 200 or 400 and check shutter speed again. Keep increasing your ISO gradually until your shutter speed is 1/30 and up.

Step 7 - Now start practicing with different apertures, decreasing the number down until the "lowest" number the lens can handle.  This might sound confusing but the smaller the f number the larger the aperture e.g. f2 is larger than f10.  My Samsung 30mm has a starting aperture of f2.  The lower the number, the less will be in focus i.e. the area that the focus point is on will be in focus but surrounding area will start to blur out the smaller the number becomes.

Examples:


f22, shutter 1/30

f10, shutter 1/160

 f2, shutter 1/3200

This is called Depth of Field.  Shallow DOF is a photo with a low f number where only the focus area is sharp and everything else blurred out.  Deep DOF is a higher f number where everything from front to back is in focus.

Take note that as you increase your f number, the blades in the lens close down further and restrict the amount of light that comes in so the shutter needs to be open longer.  That means a slower shutter speed and possible blurring if too slow and handheld.  On a tripod, not problem.

So to summarise, small aperture (bigger f number) = slower shutter speed and larger aperture (smaller f number) = faster shutter speeds.

But if you don't want to decrease your shutter speed, you can increase your ISO.

For example:
Your aperture (f number) is f7.1 and because of low light your shutter speed has slowed down to 2 seconds.  Might not sound like it's slow but it will guarantee you blurred photos handheld.  If you increase your ISO to 200, the time is speed up to one second.  If you increase your ISO to 400, speeds up to 0.5 seconds and so on.  The Samsung NX300 is excellent with noise so experiment.  Just pay attention to the noise (will show up as specks all over the photo).

But what happens if the photo appears too dark?  

That's where Exposure Value Compensation (EV) comes in.

Sorry for the little spotlights, was using another camera that uses macro lights


That set of lines next to the f number allows you to make the photo darker or brighter.  It works differently to Manual Mode but in Program Mode, you press the EV Adjust Button and turn the Jog Dial either left or right.

EV Adjust Button


Press and hold the EV Adjust Button and a blue box will show up around the lines.  Turn the Jog Dial left to darken the exposure or to the right to brighten (before taking a photo).

Examples:

0 EV, no exposure compensation

-0.6 EV, minus exposure compensation makes the photo darker

+0.6 EV, positive exposure compensation makes the photo brighter

The issue you will have with positive exposure compensation is that it will decrease the shutter speed whereas decreasing the brightness (negative exposure) will increase the shutter speed.

If you try to increase your aperture to say f22 and the camera will only allow you to go as high as about f18, then it has decided that there isn't enough light and you will need to increase your ISO to get a higher f number.

What about subjects/objects of different distances? 

When taking a photo you will probably notice there are areas out of focus.  The camera will usually focus on the elements in the foreground or closest to it unless you select focus on something further back.  With a shallow DOF, the area focused on and anything the same distance will usually be in focus as you will see in the examples below.

To get as much in focus as possible use a small aperture (large f number e.g. f10-f22) but pay attention to where the camera places the focus.

The screen might show some areas blurred out before taking a photo even when max aperture is reached e.g. f22.  But don't worry, press the Delete button before taking a photo to see the depth of field and the screen will show what is in focus.  I use this button for another purpose as it can be customized.

If you don't like the areas selected for focus by the camera, touch the screen on where you want the focus.

Examples:

f22, large amount in focus front to back

f10, I chose the focus area on the flower base so anything in front and behind of that is a little out of focus although f10 still provides a large amount of focus

f2, a large amount of the photo is out of focus and again I chose the flower base as the area of focus.  Notice how the tips of the flower are in focus, some areas of the leaves etc.  Those areas are at the same distance as the area of focus.

A larger aperture (small f number, confusing ha?) brings attention to the area of interest and is favoured for portraits, macro or anything where you want specific interest on.  What is also favoured with a large aperture is the bokeh, or pleasantly blurred out background.  Have you seen photos where there are lovely soft circles in the blurred background, for example, behind a person?  That is called bokeh and is created by the aperture blades (that open and close) and will show wherever there is a point of light (natural or false) if a shallow depth of field is used.

The great thing about Bokeh is that you can customize the shape to anything you want.  For an example check out this link http://www.diyphotography.net/diy_create_your_own_bokeh/.

On a rainy or overcast day

If you want to keep your aperture at a certain f number but struggle because of low light issues causing slow shutter speeds, then as said above, increase your ISO.  That or use a tripod.  In order to take a photo with correct exposure the camera needs to draw in more light as the f number gets bigger. So it will slow the shutter speed down to keep the lens open for longer.  If shutter speed is 1 second to 30 seconds and BULB (you choose the amount of time the shutter remains open) then that is referred to as Long Exposure.

But in this tutorial you are working during the day with enough light that you shouldn't go lower than 1 second.

To increase your ISO you can use the Menu button but a quicker way is to press the Fn button or touch the Fn menu on the screen.  Use the navigation buttons to move the blue box (selector) until it has selected the ISO setting and press ok.  Now use the navigation button again to select an ISO.

If you are starting with 100 ISO, increase to 200, then 400 if needed and so on.  Don't be afraid to increase your ISO but get the idea into your head to check on the noise level.

It's all about balance and there isn't a complete formula because each situation and lighting condition is different.  The more you practice and experiment with different lighting, shutter speeds, aperture and ISO the more you will get a feel of what will work for what.  Don't worry, not as difficult or as complicated as you think.

Ok well, that wasn't as quick as I thought but hopefully the article has enough information to get you started.  I will also be going into tutorials with the other modes but it may take time.  As you can imagine this took awhile to put together and I want to be as thorough as possible to make taking photos as easy as possible.

Enjoy and if you have questions, ask.  I will try my best to answer them.

Tuesday, June 4, 2013

Creating a multiple framed photo

I found a tutorial in Digital Photo magazine issue 166 where a template of multiple frames was used to "frame" a photo.  It involved copying and pasting and was fairly abstract.  I decided to try this a different way in Photoshop Elements 10.


1. I created my own template by using the Custom Shape Tool.  I used a plane square shape because anything complicated or intricate in design will make it more difficult to select later on.  The first square was filled with black and the layer duplicated, made smaller and filled with white.

This created the "frame" that I wanted.  Next I merged the two layers and duplicated 5 times, positioning the frames where I wanted them.  I kept the background transparent.

Note:  for a better result make sure the frames sit tightly together without gaps.


2. Opened my photo, corrected colour, levels and added other adjustments until I was happy.  I saved this photo as a separate file and renamed Trip.  I don't want to work on the original file in case I want to work on it later.

3. Drag and drop or cut and paste the template into your photo Trip and resize if necessary to fit on the photo.  Rename this layer Template. Don't worry if you can't see the photo as yet because we first have to select and remove a few pieces.  Double click on the photo layer to unlock it and rename Trip.


4. Make sure that the Template layer is selected then using the Magic Wand tool, click once on each of the white squares of the template.  You may need to refine the selection if the template you created is more detailed.  Press delete and you should now have the frame outlines and be able to see the photo beneath.  Go to Select menu and click on Deselect.


5. Create a new layer beneath the Trip layer, rename Background.  Make sure this Background layer is selected, go to Edit<Fill Layer and under Contents select White.

6. Click on the Template layer, use the Magic Wand and click on the area around the outside of the frames.  Depending on your frame design you may need to click a few times to get the entire area around the frame template selected.  This is the excess that we will be removing.  With the area selected, click on the Trip layer then press delete. Go to the Select menu and click on Deselect.

The excess part of the photo should now be deleted.


7. You can now play around with the Background layer and use textures. gradients, or even add another photo for the background.  I used a dark red, then the Texturizer filter with Patchwork selected.

Merge layers and save.


That's it :-D.