Powered By Blogger
Showing posts with label photography. Show all posts

Wednesday, April 10, 2019

A year, a year and I am still here

A year has gone by since I've posted.  But I haven't had much further to post regarding the Samsung NX300.

Now, I absolutely love my NX300 and wish I could get my hands on a 60mm macro.  I have the 30mm and the 18-55mm, both of which are very good.  I rely more now on the 30mm because for stock photos the 18-55mm is limited.

So the reason I'm posting is because I wanted to share a photo I took recently.  With camera sales seeing a decline across the numerous manufacturers, people seem to be leaning towards smartphones more than DSLRs.  The price for any smartphone that could get remotely close is a little too high for me to consider giving up DSLRs.

Anywho, back to the photo.  It's a simple photo of a Marigold found in the garden.  The petals of the Marigold caught the last rays of the setting Sun.  Other than some darkening of the edges and sharpening everything else was caught in camera on the Samsung NX300 and 30mm.

I am going to show you a cropped version of my original (which can be found on my Etsy Shop) that hasn't had any processing done.


f2, 1/500, ISO 200, no flash

I used Manual and underexposed slightly to enhance the lit area of the flower.  The settings above will be different for your lighting so use as more of a guideline.  

I feel Samsung had a good thing going with their cameras and would have loved to see them stick around.

Thursday, May 18, 2017

Samsung cameras, going going gone?

There was a rumour that Samsung would be leaving the camera market and selling their design to another manufacturer.  Whether or not this is true I have noticed the absence of Samsung cameras and lenses on the market.

I was trying to find out the price of the Samsung 60mm macro but couldn't find one single supplier in South Africa.  Contacting Samsung didn't help as they directed me to a service center who told me to contact Samsung.  Fun eh?

So it would seem that in South Africa Samsung cameras and lenses are no longer available, unless you can find them secondhand.

Anywho, I can't think of what else I can discuss or experiment regarding the Samsung NX300 (although I would have LOVED the 60mm macro lens) so if you have anything you want me to check out drop me a message below.

Sad though, it's a pretty good camera.  Here a link to more info about Samsung and whether or not they have really pulled their camera and lenses off the market: Digitaltrends

Sunday, November 20, 2016

Topaz Labs - a world of creativity

While photography is a creative process in its own, software can either enhance or take a photo to a whole new level.

I'm not easily sold on software enhancements other than the general editing but when I want to have some fun, like Twirling (yeah I said Twirling) then Topaz Labs is my favourite for editing features.

While Twirling might not seem like a photographic quality, it does help to have a decent photo to start with and once you start with Topaz Clarity, Simplify, Glow etc you start creating beautiful abstract art.

My personal favourites are Clarity (for its non-destructive sharpening qualities), Remask (for detailed masking of areas) and Glow (beautiful ethereal results).

Topaz works with Lightroom and Photoshop as a plugin or can work through an standalone program called PhotoFXLab.

The PhotoFXLab allows you to apply multiple effects to one photo which is a plus when working in Lightroom and you want to add more than one effect.

Below are some examples from just some of the software from the Topaz Collection.  All was done in Lightroom 4.

 From the top go to the left: Original photo, Simplify, Lens Effects
From bottom to left: Restyle, Mix (Simplify, Lens Effects and Star Effects), Glow

You are also welcome to give the software a trial run for 30 days.  Read the requirements for Glow, Impressions and Textures.

Take a look at their website: Topaz Labs

Topaz Labs also features videos to help you get started with each of the different effects.

Wednesday, October 19, 2016

She.Clix with style

It's time for the Photo & Film Expo, now in its 8th year to be hosted at the Coca Cola Dome from Oct 27th - Oct 30th 2016 from 9am to 4pm.

Photo banner from Photo & Film Expo

Details of the event, workshops, brands etc can be found on the website Photo & Film Expo.  Check out the cool workshops, competitions and speakers on their Facebook page.

Tickets to the event can be bought at TicketPro.

I like to refer to the expo as a feast for the photographic mind because with such a variety of brands, gear and free workshops it's not difficult to see why the Photo & Film expo lives up to its title.

"The Largest Photographic Event in Africa"


Gear galore with free workshops (over 100 sessions), body painting, underwater photography, competitions (don't forget to enter the mother of all competitions), free lens (outer elements) and sensor cleaning and the list go on and on.

A wonderful addition to this year's expo comes in the female form of She.Clix. Created by a team of female photographers "that promotes emerging female photographers as well as assist in promoting established ones in other platforms".

You will be introduced to the works of photographers from various genres including Jabulile Hlanze, whose work showcases everyday life with a depth that draws you into the photos as if you were there.

Yvette Victor will take you on a fantastical journey of photographic art with a uniquely creative personality.  Step into her world of magic as she sees it.

Jordan Hyde speaks to the confidence of a woman in her body where all shapes and sizes are beautiful.  She positively impacts on how women feel about their bodies and emphasizes that strength in her photos.

These are just some of the talented female photographers that will be showcasing their work, each telling a story of how they came to form their style of photography.

See the inner workings of a photographer's spirit and mind with displays of work and get to know who they are and how they came to be.

For more information on She.Clix go to their FB page - Facebook

You don't want to miss this event.

Monday, August 29, 2016

Understanding White Balance

I've been missing in action on this blog.  Whoops lol.

If you have had trouble understanding White Balance, the links below should help you get a better grip on what is going on. The first article by Graphics simplifies White Balance a little better.

White Balance can be just as confusing as understanding Aperture as it can look as if everything is working back to front.

A higher Kelvin number e.g. 10 000k is more blue whereas a lower Kelvin number e.g. 2500k is more red.

When you take a photo and it appears too blue/cold, you increase the Kelvin number and it adds in more red.  The same goes for a warm photo that has too much red so you decrease the Kelvin number to add more blue.

Ha?  White Balance works in reverse like Aperture.  When you increase the Kelvin number the camera is reading the white balance as having more blue than red so it compensates and adds more red.

WB selection and changing of presets is not available in Auto, Lens Priority and Smart Mode.

The automatic options are represented as Auto WB (the camera chooses), Daylight, Cloudy, Flourescent, Flourescent NW, Flourescent Daylight, Tungsten and Flash.  Followed by customary options Custom Set and Colour Temperature (where you dial in the Kelvin number you want).

To access WB:

Via the Menu Button - Select Menu, under Camera icon menu on the left scroll down until you get to White Balance, select and then select one of the WB options.

Via Fn Button - Click Fn button, scroll down to the WB menu option, it will be the third row from the top.

You can adjust the WB presets by scrolling to the preset and then pressing the DISP button (up button for this selection) and move the selection tool around e.g. say you want to add more green and blue, move the selection up and to the left.

After you have changed the preset it will show up on the right side of the screen next to the WB symbol selected e.g. if you selected Cloudy, a cloud will show with the letters, B, G, M or A (A is yellow) or a combination of two letters in their colours (B is blue etc).

This doesn't make a new preset but changes the current one however you easily just change it back to the original by using the Reset button or moving the selection to the center dot where the two lines intersect.

For Custom Set, you need to take a measure of the white balance either with a grey or white area.  Select Custom Balance (just scroll until it's highlighted) then press DISP (up button).

There will be a grey box in the center, hold this over an area of white or grey then click/screen touch Measure.  The camera will click as if taking a photo but is only taking a measure, you won't find any photos in your review.

Once a measure has been taken the camera will go back to the Live view screen. Custom Set will be selected as the WB and the measure it took will be used. That won't change unless you take another measure or change the WB to another setting.

For Kelvin Colour Temperature, here you set the temp according to a number from 2500K (will add more blue) to 10 000K (will add more red).  Select Color Temperature (has a big K) then press DISP to change the temp.

Below are some sample photos.

The first (and not so glamorous) Jelly Bean photos were taken indoors under a fluorescent energy saving bulb, 14w, cool white (but more an off white colour).  I included a sack material, which is a light brown, colourful Jelly Beans and used my Grey Card for the background of the sweets.

AWB and Custom Set were more accurate where Custom Set was measured from the Grey Card.  I included the highest and lowest in the Color Temperature (Kelvin Temp).


Taken inside using natural light from a window behind the mason jar.  For Custom Set one measure was taken from the center of the jar and the second from below the jar.

Desert Rose - taken outside in the shade of a tree with sun just past midday.  I used my grey card for the Custom Set, as you can see there is more green in the custom measure than in AWB.  Daylight was a little more closer to what I saw as it contains a warmer cast than AWB.


As you will have noticed I didn't play with the Flash WB. Balancing ambient light and flash is a whole other ballgame, especially when you are stuck with the "internal"  flash.  So for now that will be left for another post.

Ok that's about it for this post.  Check out the articles below, they should help clear up a few things and have some great info.

Understanding White Balance
Bob Atkins
Fstoppers
Cambridge in Colour
Exposure Guide

Saturday, March 12, 2016

Samsung NX300: Smart Mode Night, Fireworks and Light Trace

This post has taken me a long time to complete.  First reason being that these features are not used on a regular basis and second because I came across something unusual about the Fireworks and Light Trace features and tried to find an answer for it.

Read on if you noticed your camera going out of focus in Light Trace and Fireworks.  Otherwise, scroll down to the heading Night Mode.

So, about the second reason.  I took photos of a colour lit fountain and to be honest, the results were really beautiful to me.  I started to get excited about Light Trace and Fireworks (ignore the name, I'm not a fireworks person because of my animals but this feature can be used creatively).  The photos were sharp and lit just right (no flash was used because of long exposure) and I was happy with the results.

When I arrived home I sat down to write the post and had the camera in front of me as I prefer to go through everything again while writing.  Now when I was taking the photos of the fountain I didn't look at the screen when I used AF (Auto Focus).  The camera was placed on a steady stone ledge, two second timer set, half pressed the shutter button for focus and then pressed all the way to take the photo.

When I half pressed the shutter button at home (I didn't take a photo) I noticed that the camera went out of focus.  What?  I touched the screen to place the focus, it didn't change, just remained slightly out of focus.  It happened in both Fireworks and Light Trace but when I tried Night and other features focus was obtained.

I focused in Night and switched over to Light Trace, half pressed to focus, even touched the screen as I did this a few times, and the camera immediately went out of focus.

Worried that there was a problem with the camera I searched the Internet to death.  All I found was that a majority of reviewers/bloggers just glossed over the feature and barely, if even, used it.  I was told that they prefer manual so they don't use this type of feature.  Oookay.

I contacted Samsung in my country and overseas, was promptly told this was not normal and to take it in for repairs.  I tried updating the software on camera and lenses but nothing changed.  I contacted the repair center suggested by Samsung and sent them a video plus a photo sample and asked them if they had actually played with the feature.  The repair center was a fair distance from me and I didn't want to make a wasted trip.

The repair center told me their Samsung technician said I most likely didn't have the camera stable and that's why the photos were blurry.  Er...the photos were not blurry and the out of focus issue occures before photos are taken plus the camera was stable.  They said they were get back to me...they didn't.  Samsung also left the conversation.  Both parties above wouldn't answer me when I asked them if their technicians had actually played with the feature.

So I went out to two different Samsung stores to test out their NX300, which they didn't have on display.  Instead I tried out the NX3000 and NX Mini, both of which did the exact same thing in Light Trace and Fireworks mode: when you tried to focus the AF went out of focus.

One thing to note here, Manual focus also worked so I could focus there.  But I was beginning to wonder if this out of focus could be related to the lens and feature.

For example, with my 18-55mm lens I had more in focus at 18mm than with my 30mm at the same distance.  Light Trace is expected to be used for moving light like car lights but at a distance.  Fireworks is also expected to be used at a distance.

And yet no one could give me an answer.  I'm going to post the video and would be curious to know if anyone is experiencing the same thing, an experiment if you will.

It's nothing major, but little things like this irritate me when I can't get an answer and wonder if it's product failure or product feature.

Note, the video had to be taken in a dark room (for Light Trace/Fireworks) because of the long exposure.  In daylight everything would be white because of the amount of light that is being allowed in.  The camera was also placed on a table.  No photos are taken, they would be blurry if the 2 second timer isn't used due to me moving the camera but the point here is to show how the AF goes out of focus BEFORE the photo is taken.

Light Trace

Night Mode

Night Mode is a fairly good feature for night time shots where you don't want to have to fiddle with the settings.  It brings in enough light to add ambiance to the photo but I did notice the increased amount of noise.  You do need to have a stable surface or tripod even though the shutter speed can be fast enough for handheld.  You can actually use this during the day

Reason: the camera takes about 4-5 photos in a quick burst and a faster shutter speed means a quicker burst whereas a slower shutter speed means a slower burst.  The camera then puts these photos together, like Exposure Bracketing, to get a properly exposed shot.

While you may be able to get away with handheld when the shutter speed is higher, there is still a chance of the photo blurring in the finer details.

To activate Night mode, change the Mode dial to the black camera icon with the S inside and then scroll along the features bar at the bottom until you get to Night. If you are already in Smart mode but have selected another feature, tap the black camera icon with S on the screen left side or press the Fn button and select the feature.

The camera chooses ISO, shutter speed and aperture unlike Fireworks where settings don't change.

Where the ISO is concerned, the more light in the scene the lower the ISO.
The photos tend to have a slight softness, more so than Fireworks and Light Trace but unless you zoom in it's not too noticeable.

Settings:
Autoshare: Off
Smart Mode: Set to Night
Photo size: highest set at 20M 5472x3648 (3:2)
Quality: No RAW here so set to Super Fine
AF Mode: Single Auto Focus but Manual focus is also available
Touch AF: Touch AF
MF Assist: Enlarge x5
Focus Peaking:  I leave this on, Normal and White colour
Depending on your lens OIS may be activated
Drive: Set to Single but I navigate on screen to use the timer
Flash is not available even though it shows up in Night and Light Trace mode

Photos are as is, no editing except for cropping.  The first photo was taken just before sunset when there was still enough light but the camera was placed on a stable surface.

Notice how the feature turned the lighting in the fountains into a fire like effect.  The water is not as smooth as with Fireworks or Light Trace. 
Aperture f3.5, shutter 1/40, ISO 1600, focal length 18mm.


A night setting which was captured exactly as I saw it with different areas lit nicely.  The squiggly lines are reflections from another shop, not blurred movement.  Noise is very high, the details are a bit soft in comparison to the other photos below.  This can be fixed in Lightroom to a degree.
Aperture f5, shutter 1/8, ISO 3200, focal length 42mm.

Fireworks

As I said above I don't like fireworks because of the emotional distress it causes my animals but the feature doesn't necessarily have to be used for it.  Both Fireworks and Light Trace are for moving light so technically any moving light will work.  With stationary light you won't see much of the feature in work there.

To activate Fireworks mode, change the Mode dial to the black camera icon with the S inside and then scroll along the features bar at the bottom until you get to Fireworks. If you are already in Smart mode but have selected another feature, tap the black camera icon with S on the screen left side or press the Fn button and select the feature.

As with both Fireworks and Light Trace you need a stable surface or tripod as both use long exposure and the features work best at night or just before sunset and there on.  If you try taking a photo during the day the photo may show up completely white or mostly blown because of the amount of light being allowed into the camera.

The photo I took was about 30 min after sunset.  You don't need to do anything other than...uh focus (if you read above you would understand).  You don't need to set anything as you would with P, A, S, M but you can still change the following settings (below is what I used in my settings).

Autoshare: Off
Smart Mode: Set to Fireworks
Photo size: highest set at 20M 5472x3648 (3:2)
Quality: No RAW here so set to Super Fine
AF Mode: Single Auto Focus (here you can change to Manual Focus)
Touch AF: Touch AF
MF Assist: Enlarge x5
Focus Peaking:  I leave this on, Normal and White colour
Depending on your lens OIS may be activated
Drive: Set to Single but I navigate on screen to use the timer

When I took the pic I was unaware of the focus situation so I didn't take a manual shot as an example and haven't had a chance to get back to the fountain but hope to soon.

The camera takes one photo, long exposure unlike Night mode that takes several photos.

The photo below is the result, SOOC (straight out of camera meaning no editing was done i.e. levels, colour etc) with some cropping, ok a fair amount of cropping.  Straight out of camera and wow.

Aperture f8, shutter 3", ISO 100, focal length 55mm

Other than the noise and some blurred people movement (remember long exposure means anything moving will be blurred) the lighting of the fountain is beautiful, ethereal and clear.  Anything not moving is in perfect focus at a distance and behind the fountain whereas the tree top left is closer and slightly unfocused.  Even the person sitting to the right is in focus.

As I said above regarding focus, the feature appears dependent on distance and the lens.  I used the 18-55mm in all of these photos.

What looks like just lighting in the fountain is a mix of light and water, the water giving that smooth, soft look.  The noise isn't too bad, in fact I don't mind leaving it as is although I'm not too fond of letting JPEG take over.

The camera seems set on leaving ISO at 100, which is no problem for me as this keeps the noise down (the lower the better as long exposure introduces noise), shutter at 3 seconds and aperture at f8.  f8 should have quite a bit in focus from front to back yet that darn focus issue.

To get this feature to work with something other than fireworks I would suggest a bit of distance between you and the subject/object because of what I mentioned earlier on.  Assuming it's a part of the feature that is.

The Fireworks feature does have some creative potential so don't ignore it.

Light Trace

Not much difference other than the longer exposure time and that the camera adjusts the aperture according to the amount of light.  The end result is similar and below are two photos, one from just before sunset and one after.

To activate Light Trace mode, change the Mode dial to the black camera icon with the S inside and then scroll along the features bar at the bottom until you get to Light Trace.  If you are already in Smart mode but have selected another feature, tap the black camera icon with S on the screen left side or press the Fn button and select the feature.

But first, the settings:

Autoshare: Off
Smart Mode: Set to Light Trace
Photo size: highest set at 20M 5472x3648 (3:2)
Quality: No RAW here so set to Super Fine
AF Mode: Single Auto Focus (here you can change to Manual Focus)
Touch AF: Touch AF
MF Assist: Enlarge x5
Focus Peaking:  I leave this on, Normal and White colour
Depending on your lens OIS may be activated
Drive: Set to Single but I navigate on screen to use the timer
Flash is not available even though it shows up in Night and Light Trace mode

Aperture f22, shutter 10", ISO 100, focal length 18mm.

This one I really love in how it turned out.  While the movement of people is blurred, the tree, the lit fountain etc are all in focus and has a magical feel.
Aperture f11, shutter 10", ISO 100, focal length 42mm.

I don't normally go for the quick fix settings but these three I find very interesting and useful.  Would love some feedback from NX300 owners, even other NX camera owners regarding the camera going out of focus in Light Trace and Fireworks so if you have time please leave a comment if you notice anything.

Here is a video example of using the Samsung NX300 with Light Trace.

For South African readers who own a Samsung NX camera, if you are looking for the elusive 2D/3D lens have a look at the Samsung store in The Glen as they have stock (at the time of this posting).

Tuesday, January 19, 2016

A little fun in RGB and Curves

I love puzzles, love figuring things out.  Recently I tried out two 'tests' that were posted on Facebook.

The first one tests your knowledge of curves.  The creator of the test provides a quick (I would have liked a little more information) explanation on each answer.

Understanding how curves works, whether in Photoshop or Lightroom, helps to create colour manipulations with just a few adjustments.  You are able to work independently on the red, green and blue channels (RGB - Red, Green, Blue) and the slightest shift on the curve can dramatically change the photo.

The first link here is the Curves Challenge.  The second link is each part of the challenge discussed lightly.

Curves Challenge
Curves Challenge Explained

Now the reason I posted the Curves Challenge first is because it can help you understand how RGB works i.e. moving one curve up lightens the colour, moving it down darkens and this also works as an add and subtract equation.

The more you lower the curve below the grey/gray line the more you remove the colour.

The second quiz is a little more difficult.  Here you are working with numbers, each number corresponds with the amount of red, green and blue that has been added or removed from the photo.

The first number is red, the second green and the third blue.  I'm not going to give it away and even though this is not an absolute necessity in photography it will help you understand colour a bit better.  And hey, it's fun once you get the hang of it.

Think about adding and subtracting, the higher the number the lighter the colour, the lower the number the darker the colour.  Also think about how colours work together i.e. if you mix green and red you get yellow etc.

I found that working out the first two and then adding the third is how I was able to figure out the closest answer.

RGB Challenge

Once you have an idea of this all fits together it should open your eyes to the bigger world of colour.

But...if you want to be able to test out your colour theories and practice try this Colour Chart.

Monday, December 28, 2015

Samsung NX300: Key Mapping (working with Auto Exposure Lock)

By now you will hopefully have figured out how to use many of the features of your Samsung NX300.  One of the features, though not so obviously placed, is the Auto Exposure Lock or AEL.

When taking photos you will run into situations where you want to recompose the scene but not change the exposure.  Recomposing/re-positioning is when you decide to change where your subject/object will be placed e.g. instead of directly in the middle you choose to place the subject/object slightly to the side.  Doing so can change the exposure when you don't want it to and that's one of the times where AEL comes into effect.

But, recomposing requires that you keep the focal plane the same i.e. the distance between your camera and the subject/object the same.

Before going into AEL let's quickly discuss Recomposing.  When you press the shutter half way down you are locking in the focus (plus the exposure) and if you decided to recompose (change the where subject/object is placed) you would need to make certain the subject/object remains at the same distance because any change in distance will affect the focus.  In other words, you could go from having the subject/object in focus to being out of focus if distance changes.

For a more detailed explanation take a look at this article: Recomposing

What's the point of AEL if you can just half press the shutter to lock in exposure and focus?

AEL helps in situations where the camera under or overexposes part of the scene e.g. the camera might expose for the background (so it will be properly exposed) but the foreground may be too dark.  It makes metering easier, especially for those who don't have a full understanding of how Aperture, Shutter and ISO work together.

A quick note: AEL doesn't work in Manual because Manual is controlled by you. It works in the following shooting modes: PAS.

To activate: Go to Menu, select the icon below the video camera that looks like a little person (3rd menu icon from the top). Scroll down to Key Mapping, press OK and under Custom select either AEL or AEL Hold.  The Delete button (the trashcan bottom right of camera) is used as the Custom button and for AEL when the function is assigned to it.

AEL, when pressed to lock exposure, will lock it until you have taken the photo.

AEL hold is pretty obvious, it will hold that exposure even after you have taken the photo and this can be very useful for Panoramas and photo stacking where you want the exposure to be consistent.

AEL doesn't depend on recomposing to work, but recomposing works better with AEL. So you can change the focus plane (distance between camera and subject/object) and keep the exposure the same when using AEL and not worry about focus.

How to use AEL:

1. Make sure that AEL or AEL Hold is selected in your Menu options.

2. Select a shooting mode, either Program (P), Aperture Priority (A) or Shutter Priority (S) but not Manual.  Remember this doesn't work in Manual.

3. Decide on your shot and place the focus point over the area you want to expose (use the exposure) from, even zooming in if needed.  Press the Delete/Custom button, which then locks the exposure.

Since the Samsung NX300 holds the exposure until you take a photo, you can safely release the Delete/Custom button, recompose and take a shot.  You won't have to worry about the AEL deactivating until the shot is taken.  But, if you take too long and your camera goes into sleep mode, AEL deactivates.

4.  Recompose your photo, half press the shutter to gain focus and take the shot. The exposure will remain the same because you locked it in so the camera won't take another reading of light.

Keep an eye on your settings and practice with taking different exposures as you may not always get the result you expect.  This is where you learn about how shutter, aperture and ISO work.

I try to find articles that are easy to understand as well as helpful.  Below are two links that will give you examples and more insight into using AEL.

Digital Camera World
Auto Exposure Lock

I'll play around with the other features under Custom (which was originally as preview for Depth of Field) and post as I go along.

Wishing everyone a great New Year!

Sunday, August 30, 2015

Improving your photographic knowledge

As I mentioned in Composition, learning how to use your camera is just one part of photography, learning how to take photos is the next step.

When I bought my first DSLR I didn't have a clue how to use it other than to stick to Auto.  Out of frustration, I put my camera away for over a year because I lacked motivation and encouragement so felt I was just wasting my time.

After following a few photographers and their work, I decided to pick up my camera again and start teaching myself as best I could.  I couldn't afford a workshop, didn't have transport to move around to clubs and Youtube chowed my bandwidth.  So I stuck to books.  Unlike some other photographers who progressed within a year, I took longer.  Without direction, guidance and so on, I was floundering a bit from one place to another and learning erratically.

But what made me improve was taking the time and dedication to learn.  I wish that I could have gone to a workshop because there at least you have a proper starting point, someone to help you, motivate you and keep you going.

Some photographers don't need a workshop, they are able to focus well enough to work on their own. But for someone like me with waaaay too much going on in my mind and my life, I couldn't focus the way I used to so a little backup was always needed.

I have been following a very inspiration photographer called Christina Greve.  I would suggest reading her bio on how she started on her FAQ page under the question: Did you study photography in school or are you self-taught?

She provides workshops in photography and is also a Life Coach.  Christina's photos are at times light and delicate and others times slightly moody, which will appeal to many photographers of different genres.  She is currently offering a workshop, which starts in September 2015.  More info can be found here Workshop.

Enjoy!

Sunday, June 14, 2015

Samsung NX300: Video sample

Okay, okay, I have been so behind this.  I did make a video, two actually.  One is already on Youtube, which I will post below.  The other still needs to be loaded and contains examples of the different features but it's rather big and will take time to upload (I use my night time gigs and will take a few hours depending on my server).

I also have a post about the whole process but as video isn't my area of expertise I'm still doing some research to better help you and me.

In the meantime, here is the link to the Youtube video.  It was taken at the Annual Airshow 2015 at Zwartkops SAAF Museum and contains some features like Picture Wizard's Retro, Classic and Landscape including Multi-Motion.  The Multi-Motion is really something funny to look at and can make for some interesting videos.  I show both fast and slow speeds in the second video (hopefully up soon).

The videos were shot with the Samsung NX300 and 18-55mm lens (I don't have a Samsung telephoto and want to have a wide angle option besides my telephoto on my Canon).

Enjoy and I'll get back to you soon!

Samsung NX300 with 18-55mm lens

Thursday, March 19, 2015

Samsung NX300 and Tutankhamun

Before all the hullabaloo I was able to get to the Tutankhamun Exhibition at Silverstar Casino recently and it is truly an amazing experience.  The exhibition has been extended to 12 April 2015.

The rules of the exhibition state that you are allowed to take photos but ONLY for personal use and if you do not interfere with the viewing of others.  Also no tripods, flashes or backpacks allowed.

So naturally I took along two cameras lol.  I took my Canon 650D with 50mm (low light lens) and my Samsung NX300 with 18-55mm kit lens (I wanted a wider angle as the 50mm doesn't having zooming capabilities).  Both fit into my small shoulder bag.

The photos posted here have been taken with the Samsung NX300 and 18-55mm.  A member of my photographic community will be working with my one photo (the same composition taken with the NX300 will be posted here) and when available on his site I will post the link here.  He's the reason I started playing a little more with Lightroom 4.

I'll admit I'm not an expert where LR4 is concerned because I have been working with PSE the entire time.  But thought I'd give it a try.  Other than adding my watermark in PSE, all other editing has been done in Lightroom 4 (including using the Cloning Brush).

You will see that with some photos the ISO was 3200, which is quite high but working with the Luminance and Detail slider under Noise Reduction helps to reduce the noise greatly.  Just go easy with the Luminance slider as it will start to soften the details the higher you go.  Work with the Detail and the Contrast slider to bring back more detail.

Also, most of the photos were taken using the Smart Shooting Mode. Although I won't remember which feature (EXIF data shows these features as Normal) I think I used the Rich Tones feature the most.

ISO 3200, 1/25 seconds, f4.5


ISO 1600, 1/50, f4


ISO 3200, 1/20, f5


ISO 3200, 1/30, f5.6


ISO 3200, 1/30, f5.6, here the statue was on a stand which I cloned out in LR4. A very common image but still an experience.  See below for settings in LR4.


ISO 3200 1/40, f3.5


ISO 3200, 1/30, f4.5 - taken in Manual Mode, RAW, no tripod or flash


ISO 3200, 1/50, f4

Learn to use your Lightroom 4 software that came with your Samsung NX300 because it's a pretty powerful program that gives far more flexibility with exposure, shadows, colour etc than Photoshop Elements (but does not allow for layers and composites).

Settings used for the Tutankhamun Head Statue:

The colour on my screen, which has been calibrated, is more golden and darker than it may appear in your browser.

Under Basic:
Temp: +2
Tint: 0
Exposure: +12
Contrast: 0
Highlights: 0
Shadows: -40
White: 0
Blacks: -52
Clarity: +7
Vibrance: +10
Saturation: 0

Tone Curve was left on Linear and customised:


HSL/Color/B&W:

Color was selected with the following adjustments:

Red - no adjustment
Orange - Saturation -9, Luminance +13
Yellow: Saturation -13, Luminance +4
Green to Magenta - no adjustment

Split Toning

Highlights - Hue was set to 60 and the Saturation set to 21
Shadows - Hue 43, Saturation 27
Balance was set to +10

I like to add some blue to some images that have an orange hue to take away some of the warmth.

Detail

I don't really like to add sharpening unless I work with Topaz Clarity as sharpening can increase the noise in a photo.  As it is the ISO is quite high in this photo so noise is also increased.  But under Detail I prefer to use the Luminance and Detail Slider.

Sharpening amount is set to 0.  Don't worry about the greyed out settings beneath it.

Noise reduction settings:
Luminance: 32
Detail: 56
Contrast: 0
Colour: 0, greyed out Detail is also 0

I didn't use Lens Correction, Effects, or Camera Calibration settings.

Wednesday, March 11, 2015

A hiccup..or two...or a few

Oookay, so my plans for the night features went awry.  Had a little issue with the car engine blowing and the neighbours being robbed so my original idea has gone out the window.  Sigh, it would have worked beautifully.  Ah well I have to get creative.

I am also thinking of a video although I'm not very knowledgeable about video but will work it out.  If you have any questions ask away and I will help you as best I can.

In the meantime, thought to share a photographer's website who creates such beautiful photos that I find inspiration on days when I feel so bleh that nothing looks appealing to me.

Everyone started somewhere, that's not a myth.  So when looking at the work of others, don't see your lack of matching skill, see a chance to improve and learn more.

And all that jazz.

Chasing Light Actions

Monday, December 29, 2014

Composition - The next step

Learning how to use your camera is just the first part, the next is learning how to take a photo.

There are rules to taking photos, but the rules are more guidelines and don't always work in every photo opportunity.  I have read numerous books, searched the internet and watched videos but still find that many of the examples photographers use are pretty useless to me.

I just don't see their photo composition the way they do.  Maybe that's because many photographers are a little too strict with the rules...and maybe those rules only exist to me once it's been pointed out in the photo.

So I'm adding two Youtube links to this post that I found very interesting.  Note, you do need quite a bit of bandwidth to play with but I am also including article links for those who can't Youtube for an hour or more in one go.

With the digital age people don't think about the photo they are taking, it's more a case of snapping away to get as many photos as you can.  While many readers here just want to enjoy taking a photo, you will get to a point where just taking a photo isn't enough if you carry on with photography.  You may even start to feel that your photos are uninteresting, maybe even crappy and wonder whether or not you should even bother.

You should, because, as you can see in Scott Kelby's video, it just takes a few adjustments like changing the angle to get better composition.  You will also see that no matter how good someone is at photography, they will still take crappy photos at some point.

Look at it this way, if you could only take film photos and the film was extremely expensive, you would think more about your composition and what the photo was about.  You could even try this out with a Fujifilm Instax Camera, which uses film and does need some thinking over before pressing the button as each photo is fairly expensive (but a very cool gadget on my wishlist).

If you feel that your photos are just not getting there, use the tools in the videos e.g. think about why you were drawn to that scene, what sparked your interest and work on that.  Photographers gets days where inspiration is non-existent and nothing seems to work, almost like a Writer's Block.

If you seem to be stuck with that block, frustrated that no matter what you take a photo of nothing seems to work, then just sit and look around you.  Forget about taking photos for a job, an assignment or to impress someone.  Forget about taking photos because you think you must.  Just look around you and if you see anything interesting, don't take your camera and take a photo.  Think about how you would frame the photo and why, what's interesting about that scene, does it get you excited about taking a photo etc?  Naturally, if it's an action photo, go for it :-D.

It's so easy to press the shutter button that you can get bored just as easily.  If you actually pay attention to your surroundings, see where your eye follows and if it makes you itch to take a photo, then photography will be more interesting and the inspiration greater.

Here's hoping you have a great photographic experience with the Samsung NX300 (or any other camera you may have) in 2015.

Article on composition
Youtube - Scott Kelby on Composition
Youtube - B&H

I'm working on an opportunity to use the Night modes in Auto Mode, let's hope that pans out soon lol.

Wednesday, December 17, 2014

Samsung NX300: Dynamic Range

Dynamic Range can get very technical but basically is the difference between brightest and the darkest areas of the photo.  Some details are "lost" in photos so using other options like HDR can bring back that information (HDR brings back highlight details).

For a better understanding that is a little less technical than some sites, go to Dynamic Range.

On the Samsung NX300 under Menu < Camera Settings < Dynamic Range you have three choices: Off, Smart Range + and HDR.

Now you may have noticed that the HDR function is greyed out.  There are two things you need to set in order to make use of the feature.

First, HDR will only work in JPEG so you need to change your Quality setting under Camera settings to JPEG (Super Fine is the best quality but takes up more space on the memory card).

Second, HDR will not work with Continuous Drive.  So you need to change your Drive (either by clicking Menu < Camera settings < Drive or the navigation button to the left of the OK button) to Single Drive.

So to use HDR, make certain the following is checked:
Menu < Camera Settings < Quality < Super Fine (JPEG)
Menu < Camera Settings < Drive < Single
Menu < Camera Settings < Dynamic Range < HDR

Using Smart Range+ is a little less complicated.  Menu < Camera Settings < Dynamic Range < Smart Range+.  Drive can be set to Single or Continuous, Quality can be RAW and/or JPEG, ISO will only start from 200 up and whereas HDR takes 2 photos Smart Range+ will only take one.

HDR can't go higher than 3200 and the 2 photos taken are automatically merged. I use Manual and the HDR takes photos based on those settings.

HDR and Smart Range+ work in P, A, S, M but remember to keep an eye on your aperture, ISO and and shutter speed

Ok, before I get into the photos below, just a quick note.

I used the 18-55mm lens because I was at the Voortrekker Monument and I needed a wide angle.  As I have said in the past the Samsung 18-55mm is a very good lens and currently outshines my Canon's 18-55mm (I don't have the STM lens).

Next, HDR is a technique that needs to be used wisely as people starting out tend go a little wild and create photos that are...well, garish to look at.  While the HDR function on the Samsung NX300 combines the photos for you (unlike AE Bracketing) the photo will mostly likely need a lot of tweaking.

Smart Range+ is far more subtle than HDR as you will see in the photos below. Photos below are all SOOC (straight out of camera) with downsizing for the net.  I only included Smart Range+ in a few photos because the difference is so small compared to OFF.

Not every photo will have the settings as each comparison of No HDR, Smart Range+ and With HDR share the same settings.


This was taken inside the monument, near the entrance.  The walls have a slight cream colour look and the HDR increased that to give a orangy/yellowish tint.  Smart Range+ did a better job by correcting the loss of bright details (compared to OFF which is the first photo).


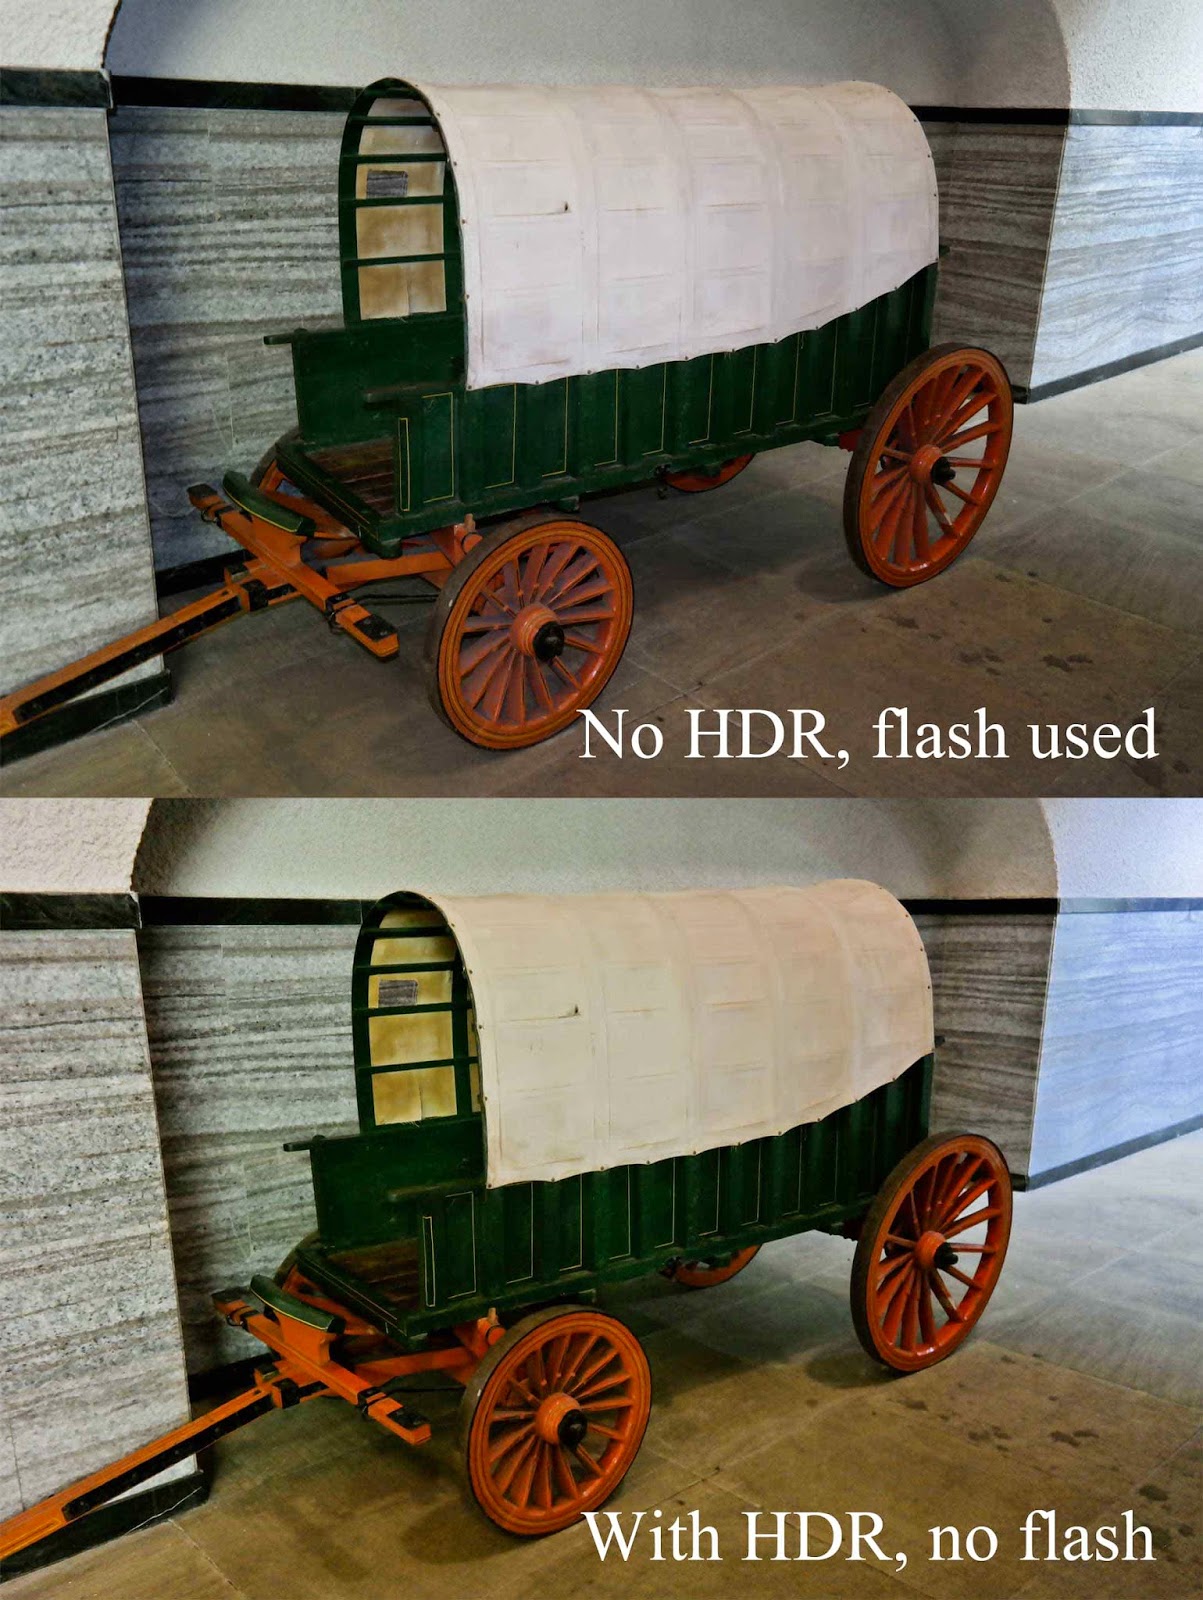
Can you believe that this was taken handheld at 1/4?  ISO was pushed to 1600.  I used the flash without HDR (setting OFF for Dynamic Range), no flash with the HDR as that option isn't available.  Again, a yellowish cast.  When taking photos, note the lighting and what it's bouncing off of, if anything.  The colour of whatever it's bouncing off can give a cast on your photo.  This is easy enough to fix by specifically working with the yellow and orange colours in Lightroom.


I chose objects that had texture and depth so that I could test out the HDR feature.  The problem with built in HDR is that you can lose quite a bit of shadows and blacks, creating an almost washed out look.  Here the HDR didn't do too badly, I like the lightened detail in the windows but would want to bring back more shadow in the crevices of the wall.  


Landscapes seem to benefit more with the HDR as it lightened the green more.  But some shadow detail was lost in the clouds and the building.  


You can see that the sky is almost blown out but the grass is lighter.  I would use masking to bring back detail in the clouds and the city, but very slightly decrease the brightness of the green.


Here, the HDR failed.  It was a cloudy, rainy day but somehow the HDR found a bit of blue.  The statue is washed out, shadow detail is gone and it almost starts to blend into the building behind.  In the Smart Range+ there is less yellow, light areas are slightly brighter but shadows are kept and the statue stands out from the building.

HDR technique is not a one click and done setup.  Nice to have a tool that can bring out the highlights more but not when the result is a washed out photo.  As you can see, HDR works in some situations and not others e.g. the landscape photos worked better than the building photos but the criss-cross stone design with windows as well as the wagon were fairly good.

Smart Range+ worked better but had results that were very close to a normal photo (Dynamic Range on OFF) that it didn't stand out enough for me to rely on Dynamic Range instead of my usual settings.

And, just for the fun of it this photo was taken with HDR, at the very top of the monument looking down to the bottom (but not the bottom most level).


Sunday, November 30, 2014

Samsung NX300: Brackets - AE, WB and P Wizard

Once again, delayed in uploading a post so please accept my apologies.  That's what happens when you go to SA's biggest photo expo, the Photo & Film Expo.  Always enjoy the show and get so wrapped in the events I forget everything else lol.

So, today's post is about Bracketing.  Unlike the HDR option, the bracketing feature doesn't combine the photos for you but instead takes a set of 3 photos based on the settings. It's then your choice to combine if you want using software.

I used a tripod for all the experiments below so that when merging, photos would be properly aligned. I also took these photos in manual mode but the features will also work in P, A and S.

To make this easier on yourself, make certain that you get correct exposure first before taking the photos because the camera will take exposure points based on what exposure you selected.  E.g. if I had my exposure at -1 instead of 0 (correctly exposed), then the exposure settings will start with -1 as the "correctly exposed" photo and place the exposed points from there.

Auto Exposure Bracketing allows for RAW format whereas White Balance Bracketing and Picture Wizard Bracketing doesn't.  As you will need to set AE, WB and PW bracketing using the drive button, you can't use Continuous Drive or the Timer.  The features will each take 3 photos based on your settings.

Auto Exposure Bracketing (AEB)

Auto Exposure Bracketing (AEB) is meant to provide you with 3 different exposures (some more advanced cameras allow more than 3 photos), one underexposed, one correctly exposed and one over exposed. The idea is that you get 3 options to choose from later on if you are not certain what exposure to use in a specific lighting.  You can decide on how many stops e.g. -2, 0, +2. The negative and positive will be the same number.

The AE Bracket feature is favoured for HDR (High Dynamic Range) which records more detail in shadows and highlights when 3 or more different exposure photos are combined.  You do require software for this and while Lightroom 4 is a powerful product you still need photoshop to merge the photos into an HDR image.  There are also other programs for merging, I use Photomatix but Photoshop Elements might be a cheaper option.

I played with Auto Exposure Bracket photos in Photoshop 11 Photomerge-Exposure feature.  The initial result given lost shadow detail, highlights and was oversaturated but under Smart Blending I was able to bring back more detail.

To use the AE Bracketing exposure feature, click on the Drive button (to the left of the middle OK button on the camera body) and scroll to your right and select AE Bracketing.  Once selected you now need to select the exposure points.

Click the Menu button and scroll down and select the User Settings (where the red arrow is pointing).


Now scroll down to Bracket Set and Select AE Bracket set.  A side menu will pop up and give you a selection of exposure points with -/+3 being the highest (+3) and the lowest (-3).  For example, if you select -/+3 the camera will take 3 photos, one underexposed by -3 points, one perfectly exposed by 0.0 and one overexposed by +3 points.

The lower the number selected e.g. -/+0.7EV, the less of a change in exposure (light and dark) you will see.  The higher the number, the bigger the difference. 

You can't use the timer (as it's under the Drive feature and you can't select both Bracketing and Timer) to prevent camera shake when touching the camera (even when using a tripod) so I found that the easiest way was to changing my shooting option to One Touch Shot.

Menu<Camera Settings<Touch AF<One Touch Shot

This way, you touch the screen where you want to place the focus and it will immediately take a shot for you without having to touch any other part of the camera, accidentally causing camera shake.

In the photos below you see the difference in exposure points and a comparison to an un-merged and two merged exposure points. Only the merged have been edited, everything else is Straight out of camera (SOOC).  Notice how the shutter speed changes (why a tripod or stable surface should be used) but the Aperture stays the same in Manual?

In Manual you can change the Shutter Speed and Aperture but as you have to press a button to change the Shutter Speed, the camera keeps the Aperture you selected and changes the Shutter Speed.  You can still change the shutter speed and the exposure points will adjust from there.

Aperture Priority Mode does the same, keeps the Aperture you want and changes the Shutter Speed but you can't adjust the shutter speed individually.

In Shutter Priority, the camera keeps the shutter speed you select and changes the Aperture.

Program Mode seems to favour the Aperture, so this you can set while the mode changes the Shutter Speed.

In Auto, Smart Auto mode and Lens Priority mode Brackets are not available.


Here the exposure points -/+3 selection was used.  Note that the over exposed photo is far more brighter than the +2 below.  The underexposed photo is also darker than the -2 below.  


The -/+2 selection was chosen here.  You could work with the darker -2 exposed photo as it contains more detail than the -3 (which could be more difficult to recover).


The top photo is correct exposure without bracketing using Auto White Balance.  The two photos below show a loss of shadows with the -2 exposure setting losing more than -3. The bracket merges could be tweaked more with better software and produce a fairly nice photo.

AE Bracketing is great for trying different exposures quickly and effortlessly.  If you want to go HDR out of camera then that is an entirely different technique that needs to be done well to look good. But it's achievable based on your skills, the Samsung NX300 will help with the first part.

I will be working a post about the HDR function in camera on the Samsung NX300 after this posting.


White Balance Bracketing (WBB)

White Balance Bracketing follows basically the same idea as AEB in that you use it to quickly get photos with different results.  But in this case, instead of changing the light and dark, you are changing coolness and the warmth of the photo.

RAW is not available here, only JPEG.

What if you took a photo and it came out too cool or too warm?  Instead of fiddling with settings, you change the Bracket settings (see above for changing the settings to AEB) and instead of AE Bracket set select WB Bracket set.

Now similar to AEB in changing the points, here you will change by how many points cooler or warmer the photos.  AB is Amber value (yellow, orange) and MG is Magenta value (red, pinkish).

So if you choose AB -/+2 you will have one photo with Auto White Balance (AWB or the white balance you selected), one photo with a warmer, more yellow/orange cast (colour) and one with less yellow/orange.

If you choose MG-/+2, one photo will be AWB, one with more red/pink and one with less red/pink. Unlike AE Bracketing, in White Balance Bracketing you can only change by increments of 1.

Photos below are SOOC.  Note that with WB Bracketing, Aperture, Shutter Speed and ISO don't change at all.  You can use other White Balance options under the Camera Settings<White Balance or by pressing the Fn button and scrolling to White Balance and choosing a setting e.g. Cloudy.

The camera will use that setting as the starting point and base the bracketing on that.


Amber value (AB) -/+3.  More yellow in +3 photo and less yellow in -3 photo.


Magenta value (MG) -/+3.

If you not certain about what white balance to use, first choose the one you think is closest e.g. Cloudy Day or go with Auto and let the camera choose.  If you are more knowledgeable about White Balance you can use a custom white balance (uses a Grey Card to get the correct balance) and bracket from there.


Picture Wizard Bracketing

The Picture Wizard Bracketing feature is more fun orientated and for those who want a photo in different styles e.g. Vivid, Retro etc.  This is a very quick method for trying out those styles but you are limited to 3 at a time from a selection of 9.

RAW is not available, only JPEG.  To select the P Bracket feature, press the Drive button (to the left of the OK button) and scroll until you get to P Bracket and select.  To change the styles, go to Menu<User Settings<Bracket Set<P Wiz Bracket Set and select 3 styles.

Your aperture, shutter speed and ISO don't change, only the styles.  To get an idea of how each of the styles look, go to: Smart Filters and Picture Wizard.


f.4, 1/80, ISO 100.  The settings stayed the same, only the styles changed. 

There isn't much else to add about Picture Wizard Bracketing, it's a very simple and straightforward method and one you will most likely use more than the AE Bracketing and WB Bracketing.

Just for the fun of it I Photomerged with Exposure in PSE 11 (breaking the rules lol).  I merged the Vivid (for the red and yellow colours), Forest (for the intense green) and Retro (for the brown).  This is the result: 


The colour here is far more rich than with a single Auto White Balance photo.  

So you have an idea of what a little bit of imagination can do and help you create a photo with the colour elements you want by using the Picture Wizard Styles.  You are not restricted to 3 styles in Photoshop Elements, so you can take as many selections of 3's as you want, then choose how many, if not all to merge and see what happens.

Next up, and hopefully soon, Dynamic Range using the Smart Range + and HDR.

Sunday, September 28, 2014

Samsung NX300: Tracking and Continuous AF

Tracking allows you to keep a moving object/subject in focus.  One you have placed the focus point (touched the screen over the area where you want the focus to be) the camera will start tracking the object/subject under that focus point even if there is movement.

To activate got to Menu then Camera Settings (camera icon at top), selected Touch AF then select Tracking AF.

The tracking shows up as a white border box and will track the subject/object as long as it's in view of the camera i.e. if you remain still as the action moves past.  If you pan (move the camera by following the action) then the tracking will remain on the object/subject as long as it's in view.

If the camera loses focus while tracking, a red box will show and focus will be reset.

I did find that sometimes the tracking wanted to wander and track something else (in this case I used a heavy wind and flowers for this experiment).  When it did I had to touch the screen to refocus.

Tracking is available in Auto Mode, Program, Aperture, Shutter, Manual and Lens Priority Mode.  In Smart Mode Tracking is only available in Beauty Face, Best Face and Creative Shot.  It's not available in Action Freeze.

The thing about the Tracking feature is that it will carry on tracking (while object/subject is in view) until you press the shutter button half way down.  This then locks the focus in and as long as the subject/object remains on the same focal plane (distance from the camera) it will remain in focus.  If the object/subject moves out of the focal plane after locking (pressing the shutter half way down) in the focus then it will be out of focus as the camera is no longer tracking it.

Annoying if you want to keep the moving object/subject in focus.  So what do you do?  If you want to rely on the camera's help you need to change the AF Mode to Continuous Auto Focus.  You also need to keep the Tracking feature activated (Menu<Camera settings<Touch AF<Tracking AF)

Select Menu on the camera, make sure the Camera Settings is selected (top sub menu with camera icon) and scroll down to AF Mode, then select CAF (Continuous AF).

What this does is continuously refocus on the moving subject/object even when the shutter is pressed half way down.

If you don't want to use the Tracking and would rather pan and track the movement yourself, then select Touch AF under the Touch AF menu while leaving Continuous AF selected under AF Mode. Wherever you touch the screen to place focus, CAF will continuously focus on the area but will not track.

So to manually track you will need to pan (move the camera with the action) and keep the subject/object under that focus area.  It doesn't matter if you move closer (don't forget what the closest focusing distance is of your lens) or further away.  As long as the subject/object is under that focuses area it will remain in focus.

For the AF Area under Camera Settings you can use Multi AF and touch the screen to place the focus where you want it if you are not happy with the camera's placement.  But, each time you release the shutter button and press half way again your selected focus will be lost (unless you press half way quickly).  The camera will choose the focus points so you would then need to touch the screen again and place the focus where you want.

For something a little more accurate, Change the AF Area to Selection AF.  Each time you release the shutter button and press down again, the area you chose to focus will remain there (the camera doesn't have control here, you do).

The downside of Tracking and Continuous AF is that it's not always fast.  Lighting conditions can affect how fast the lens focuses but I found it lagging a bit behind which could mean lost shots.

Another issue I had (besides the camera crashing on me once or twice) was that the camera just wouldn't focus.  It's happened a few times on my normal settings where the camera wouldn't focus. As for crashing, I had to remove the battery as the camera wouldn't turn off even when the switch was on Off.  Don't know why this happened.

Personally I don't favour the Tracking feature all that much and prefer to use Continuous with Selection AF for moving objects.  Panning and following the action takes some practice so play around.  Anticipating where the object/subject is going to be can aid in getting a sharp shot.

Thursday, July 24, 2014

Samsung NX300: Smart Filters, Picture Wizard and Editing on camera

The Samsung NX300 provides in camera editing of colour, contrast, exposure etc as well as using Smart Filters and Picture Wizard.  All offer creative options besides basic editing which allows you do to adjustments in camera and upload directly via the Wi-fi option without having to go through your pc.

In the photos below I have taken shots of a setup where I tried to incorporate as much colour variations as possible as well as texture.  None of the photos have been edited on the computer other than to decrease the size for the blog.  Any editing has been done directly on camera.

Please read below on how to activate Smart Filters under the camera settings.

I did have an issue importing any RAW photos into Lightroom 4 where I used the Picture Wizard feature.  After importing, the photos would seem to lose their adjustments e.g. Classic would turn from black and white into a normal colour photo without adjustments.  After a quick experiment I found that JPEG worked fine but not RAW.  This could be due to JPEG processing photos in camera whereas RAW keeps the photo as is without any form of processing (the adjustments are a form of processing).

So, for uploading via Wi-Fi and to keep the adjustments for Picture Wizard and editing (Smart Filters only allows JPEG), set your Quality to JPEG (Super Fine is best).

Duh me, only realised this after packing my setup away.  Instead of the having the photos themselves I did a screen capture of the RAW files.  Just didn't have the motivation to reset everything again lol.

This is the original image


Smart Filters

How the freak do you activate Smart Filters?

That was my first thought when trying to follow the instructions (all of one sentence) in the manual. Unless hidden somewhere in small print, the manual doesn't seem to mention that in order to use Smart Filters you need to set your Drive mode to Single and change the Quality to JPEG (Super Fine for the best if you had the setting on RAW).

I used Smart Filters after taking the photos and not before i.e. once the photo was taken I then went to review the photo, selected the icon in the middle of the screen (that shows as a piece of paper with pen) and used the navigation buttons or touched the screen on the far right icon (looks like a drawing of a landscape).  This was how I used the Smart Filter on the photos below.

(photos of icons are screenshots from the manual, just to show the icons you need to select)

In Playback (reviewing your photos) first select the middle icon (Editing):


Then select the right hand icon (Smart Filter) which looks like:


This way of adding Smart Filters is via the editing tool.  You will be given a selection of settings.

Now, the manual mentions that you can't use Smart Filters and Picture Wizard together, and you can't. Unless you do it the way I mentioned above.  

First choose the setting/feature you want in Picture Wizard (shortcut is to press the iFn button and select the dropper icon to the right of the AWB), take the photo and then review the photo.  Select the middle icon for editing, then the right icon (see above) for Smart Filters and you can apply a filter to any photo taken using the Picture Wizard feature.

To activate the Smart Filter setting under the camera options and take a photo using Smart Filters: make sure that under the camera settings, Quality is set to JPEG (Normal, Fine, Super Fine - Super Fine is the highest quality) and that your Drive is set to Single or Timer.  None of the other settings e.g. Continuous or Bracketing will work.  Also make certain that Picture Wizard is set to Off.

Once those three settings are in place then the Smart Filter option should no longer be greyed out and available.


Above are the creative features available and the last photo Edited Watercolour is the Watercolour feature applied and then edited: Auto Adjustment to make the photo darker and the colour Temp was changed to -1000K to remove some of the warmth.

You can further edit in anyway that you like with Exposure, individual colours like red, more contrast etc, all in camera.  Every time you edit a a photo a new file is created in JPEG (so the original file is kept untouched).  But editing can only be done after Smart Filters has been applied as you can't further edit this feature e.g. I would like to been able to adjust where I want the miniature effect.

To edit further, review the photo in Playback, select the middle Edit icon (see above for description) then touch the screen or use the navigation buttons to select the third icon (looks like a paint palette), which will then take you into a selection of editing options.  Click on or select an option e.g. Exposure and you will be able to adjust the exposure.

Picture Wizard

Unlike Smart Filters, which adds a painterly effect, Picture Wizard applies different styles to the photos i.e. retro for an old fashioned look.

You can't use Picture Wizard and Smart Filters at the same time but by applying Smart Filters (after taking a photo using Picture Wizard) in Playback review of your photo using the Edit tools, you can still apply both.

And also unlike Smart Filters, you can change the presets of Picture Wizard and add your own custom colours, saturation, sharpness and contrast.   I would personally leave the presets as is and rather create a custom preset using the same settings and change that.  You can reset.

For quick access press the iFn button and navigate to the dropper icon to the right of the AWB setting. Select and you will be taken to a set of 9 styles excluding the 3 custom settings.  Once you choose a setting, click ok or touch the setting and make sure a blue tick is visible in the corner, this means the style has been selected.

If you want to change the preset or the custom preset navigate with the navigation buttons until a blue box is around the style, then press the DISP button or touch the screen on the word Adjust.  You can then change the Colour, Saturation, Sharpness and Contrast.  To keep the change make sure you press Ok or touch the word Ok on the screen to set.


As you can see above, there is a very small amount of change in the styles, except for Forest which starts to present more green as the name indicates.


 In the above photos the styles are more pronounced.


I played around with a custom style.  Again, remember to set the Quality on your camera settings to JPEG as RAW will show on your memory card but not when you import into Lightroom 4 and you will lose the Picture Wizard Styles

Editing

As mentioned above, you can further tweak your photo with the editing tools.  This is done after the photo has been taken and once in Playback view, select the editing icon in the middle, then navigate to the pain palette for options:

Auto Adjustment
Brightness
Contrast
Saturation
RGB (red, green, blue) Adjustment
Colour Temperature
Exposure
Hue

Once you have selected one of the options above you will have the option of changing the adjustment except for Auto Adjustment, which does the adjustment itself.

When in the editing tools (after selecting the middle editing icon) you will also have the option of cropping the photo, rotating or adjusting the size.  My option for adjusting the size was not available but the manual says this depends on the size of the photo selected.

To crop, once you have selected the option, use the two corner squares by touching one at a time and moving the box to where you want.  Rotating gives you visual examples so you only need to select the one you want.

And I think that's about it :-).