

 Posts
Posts


For a better understanding that is a little less technical than some sites, go to Dynamic Range.
On the Samsung NX300 under Menu < Camera Settings < Dynamic Range you have three choices: Off, Smart Range + and HDR.
Now you may have noticed that the HDR function is greyed out. There are two things you need to set in order to make use of the feature.
First, HDR will only work in JPEG so you need to change your Quality setting under Camera settings to JPEG (Super Fine is the best quality but takes up more space on the memory card).
Second, HDR will not work with Continuous Drive. So you need to change your Drive (either by clicking Menu < Camera settings < Drive or the navigation button to the left of the OK button) to Single Drive.
So to use HDR, make certain the following is checked:
Menu < Camera Settings < Quality < Super Fine (JPEG)
Menu < Camera Settings < Drive < Single
Menu < Camera Settings < Dynamic Range < HDR
Using Smart Range+ is a little less complicated. Menu < Camera Settings < Dynamic Range < Smart Range+. Drive can be set to Single or Continuous, Quality can be RAW and/or JPEG, ISO will only start from 200 up and whereas HDR takes 2 photos Smart Range+ will only take one.
HDR can't go higher than 3200 and the 2 photos taken are automatically merged. I use Manual and the HDR takes photos based on those settings.
HDR and Smart Range+ work in P, A, S, M but remember to keep an eye on your aperture, ISO and and shutter speed
Ok, before I get into the photos below, just a quick note.
I used the 18-55mm lens because I was at the Voortrekker Monument and I needed a wide angle. As I have said in the past the Samsung 18-55mm is a very good lens and currently outshines my Canon's 18-55mm (I don't have the STM lens).
Next, HDR is a technique that needs to be used wisely as people starting out tend go a little wild and create photos that are...well, garish to look at. While the HDR function on the Samsung NX300 combines the photos for you (unlike AE Bracketing) the photo will mostly likely need a lot of tweaking.
Smart Range+ is far more subtle than HDR as you will see in the photos below. Photos below are all SOOC (straight out of camera) with downsizing for the net. I only included Smart Range+ in a few photos because the difference is so small compared to OFF.
Not every photo will have the settings as each comparison of No HDR, Smart Range+ and With HDR share the same settings.

This was taken inside the monument, near the entrance. The walls have a slight cream colour look and the HDR increased that to give a orangy/yellowish tint. Smart Range+ did a better job by correcting the loss of bright details (compared to OFF which is the first photo).
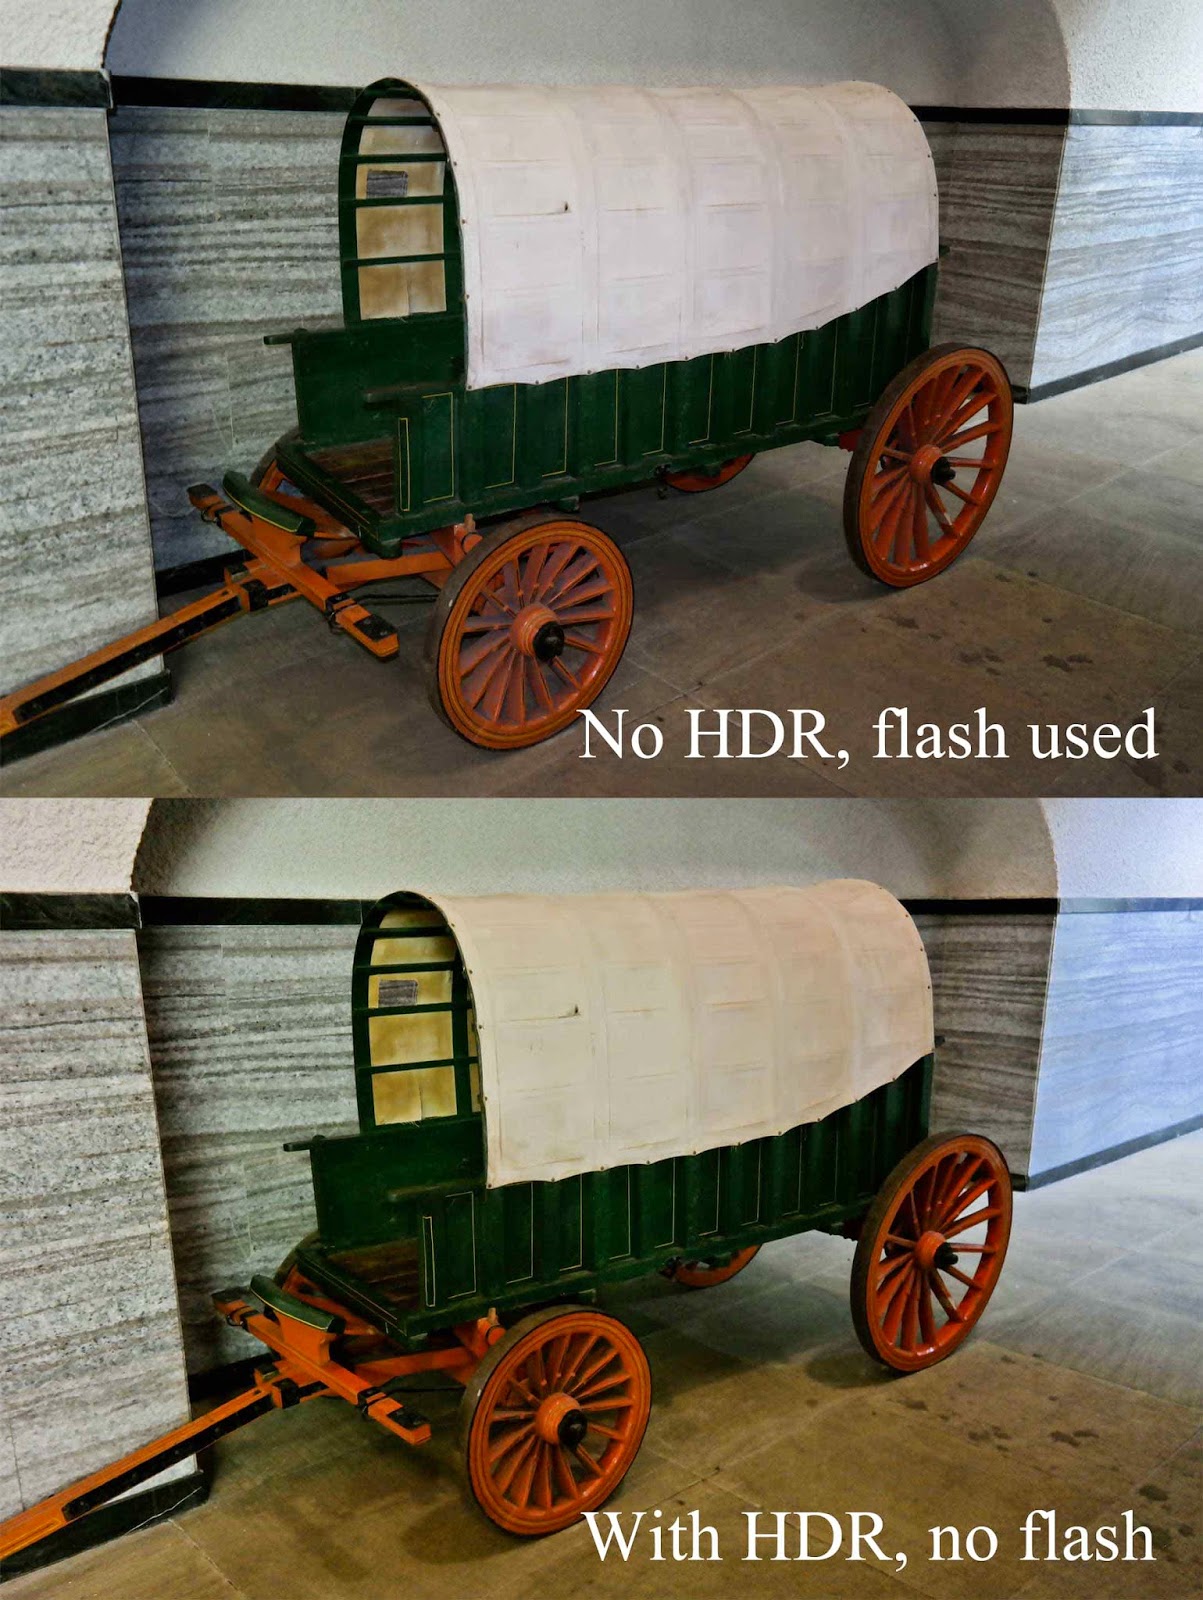
Can you believe that this was taken handheld at 1/4? ISO was pushed to 1600. I used the flash without HDR (setting OFF for Dynamic Range), no flash with the HDR as that option isn't available. Again, a yellowish cast. When taking photos, note the lighting and what it's bouncing off of, if anything. The colour of whatever it's bouncing off can give a cast on your photo. This is easy enough to fix by specifically working with the yellow and orange colours in Lightroom.

I chose objects that had texture and depth so that I could test out the HDR feature. The problem with built in HDR is that you can lose quite a bit of shadows and blacks, creating an almost washed out look. Here the HDR didn't do too badly, I like the lightened detail in the windows but would want to bring back more shadow in the crevices of the wall.

Landscapes seem to benefit more with the HDR as it lightened the green more. But some shadow detail was lost in the clouds and the building.

You can see that the sky is almost blown out but the grass is lighter. I would use masking to bring back detail in the clouds and the city, but very slightly decrease the brightness of the green.

Here, the HDR failed. It was a cloudy, rainy day but somehow the HDR found a bit of blue. The statue is washed out, shadow detail is gone and it almost starts to blend into the building behind. In the Smart Range+ there is less yellow, light areas are slightly brighter but shadows are kept and the statue stands out from the building.
HDR technique is not a one click and done setup. Nice to have a tool that can bring out the highlights more but not when the result is a washed out photo. As you can see, HDR works in some situations and not others e.g. the landscape photos worked better than the building photos but the criss-cross stone design with windows as well as the wagon were fairly good.
Smart Range+ worked better but had results that were very close to a normal photo (Dynamic Range on OFF) that it didn't stand out enough for me to rely on Dynamic Range instead of my usual settings.
And, just for the fun of it this photo was taken with HDR, at the very top of the monument looking down to the bottom (but not the bottom most level).


