Powered By Blogger
Showing posts with label HDR. Show all posts

Wednesday, December 17, 2014

Samsung NX300: Dynamic Range

Dynamic Range can get very technical but basically is the difference between brightest and the darkest areas of the photo.  Some details are "lost" in photos so using other options like HDR can bring back that information (HDR brings back highlight details).

For a better understanding that is a little less technical than some sites, go to Dynamic Range.

On the Samsung NX300 under Menu < Camera Settings < Dynamic Range you have three choices: Off, Smart Range + and HDR.

Now you may have noticed that the HDR function is greyed out.  There are two things you need to set in order to make use of the feature.

First, HDR will only work in JPEG so you need to change your Quality setting under Camera settings to JPEG (Super Fine is the best quality but takes up more space on the memory card).

Second, HDR will not work with Continuous Drive.  So you need to change your Drive (either by clicking Menu < Camera settings < Drive or the navigation button to the left of the OK button) to Single Drive.

So to use HDR, make certain the following is checked:
Menu < Camera Settings < Quality < Super Fine (JPEG)
Menu < Camera Settings < Drive < Single
Menu < Camera Settings < Dynamic Range < HDR

Using Smart Range+ is a little less complicated.  Menu < Camera Settings < Dynamic Range < Smart Range+.  Drive can be set to Single or Continuous, Quality can be RAW and/or JPEG, ISO will only start from 200 up and whereas HDR takes 2 photos Smart Range+ will only take one.

HDR can't go higher than 3200 and the 2 photos taken are automatically merged. I use Manual and the HDR takes photos based on those settings.

HDR and Smart Range+ work in P, A, S, M but remember to keep an eye on your aperture, ISO and and shutter speed

Ok, before I get into the photos below, just a quick note.

I used the 18-55mm lens because I was at the Voortrekker Monument and I needed a wide angle.  As I have said in the past the Samsung 18-55mm is a very good lens and currently outshines my Canon's 18-55mm (I don't have the STM lens).

Next, HDR is a technique that needs to be used wisely as people starting out tend go a little wild and create photos that are...well, garish to look at.  While the HDR function on the Samsung NX300 combines the photos for you (unlike AE Bracketing) the photo will mostly likely need a lot of tweaking.

Smart Range+ is far more subtle than HDR as you will see in the photos below. Photos below are all SOOC (straight out of camera) with downsizing for the net.  I only included Smart Range+ in a few photos because the difference is so small compared to OFF.

Not every photo will have the settings as each comparison of No HDR, Smart Range+ and With HDR share the same settings.


This was taken inside the monument, near the entrance.  The walls have a slight cream colour look and the HDR increased that to give a orangy/yellowish tint.  Smart Range+ did a better job by correcting the loss of bright details (compared to OFF which is the first photo).


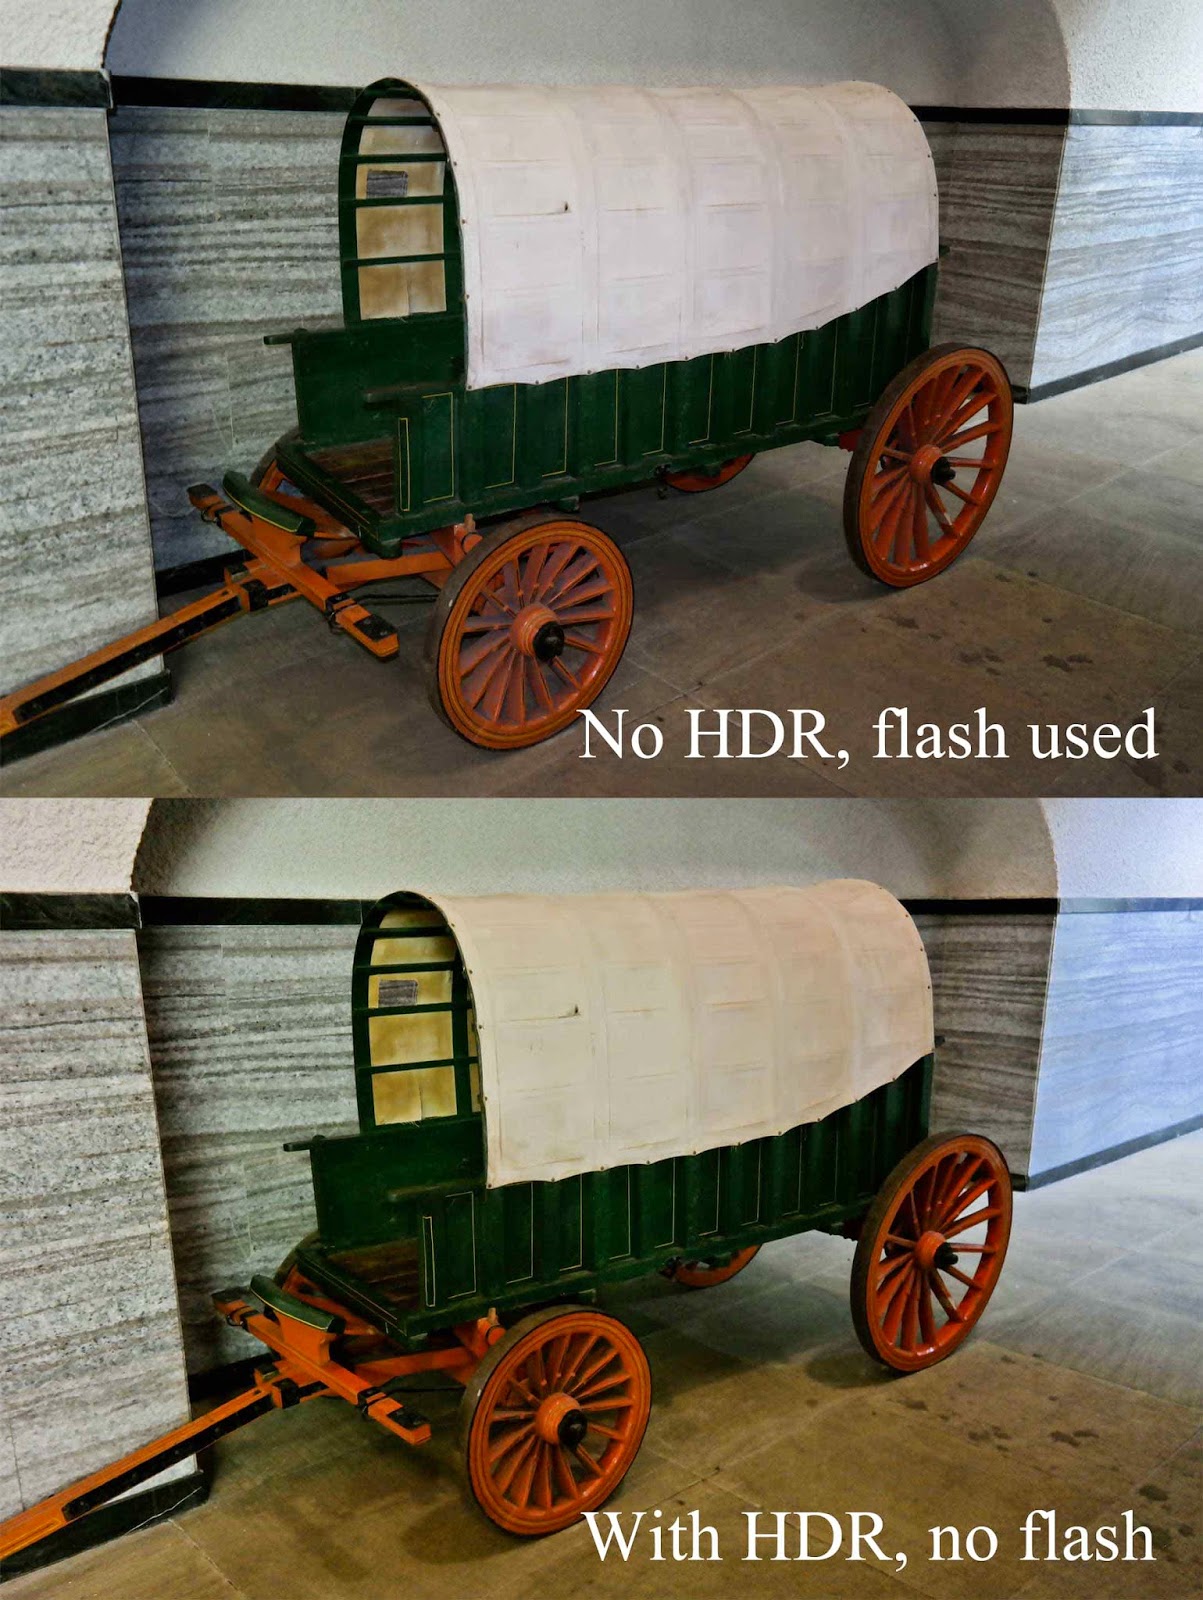
Can you believe that this was taken handheld at 1/4?  ISO was pushed to 1600.  I used the flash without HDR (setting OFF for Dynamic Range), no flash with the HDR as that option isn't available.  Again, a yellowish cast.  When taking photos, note the lighting and what it's bouncing off of, if anything.  The colour of whatever it's bouncing off can give a cast on your photo.  This is easy enough to fix by specifically working with the yellow and orange colours in Lightroom.


I chose objects that had texture and depth so that I could test out the HDR feature.  The problem with built in HDR is that you can lose quite a bit of shadows and blacks, creating an almost washed out look.  Here the HDR didn't do too badly, I like the lightened detail in the windows but would want to bring back more shadow in the crevices of the wall.  


Landscapes seem to benefit more with the HDR as it lightened the green more.  But some shadow detail was lost in the clouds and the building.  


You can see that the sky is almost blown out but the grass is lighter.  I would use masking to bring back detail in the clouds and the city, but very slightly decrease the brightness of the green.


Here, the HDR failed.  It was a cloudy, rainy day but somehow the HDR found a bit of blue.  The statue is washed out, shadow detail is gone and it almost starts to blend into the building behind.  In the Smart Range+ there is less yellow, light areas are slightly brighter but shadows are kept and the statue stands out from the building.

HDR technique is not a one click and done setup.  Nice to have a tool that can bring out the highlights more but not when the result is a washed out photo.  As you can see, HDR works in some situations and not others e.g. the landscape photos worked better than the building photos but the criss-cross stone design with windows as well as the wagon were fairly good.

Smart Range+ worked better but had results that were very close to a normal photo (Dynamic Range on OFF) that it didn't stand out enough for me to rely on Dynamic Range instead of my usual settings.

And, just for the fun of it this photo was taken with HDR, at the very top of the monument looking down to the bottom (but not the bottom most level).


Tuesday, May 20, 2014

Samsung NX300: Starting out with a quick tutorial in Program Mode

Anyone new to SLRs wants to know how to use the non-automatic shooting modes.  So here's a quick and basic tutorial to get you started.  Basic in the terms that there are so many settings but I am sticking with the general so that you can get an idea and start taking photos.

Do this tutorial during the day, with sufficient light e.g. outdoors.  Choose anything, a bench, a stone, a leaf, but make certain that what you choose doesn't move.  If you experience a rainy or overcast day, read through the instructions and the info at the end of the article.  Try and avoid direct sunlight as this can cause blown highlights and create harsh light.

Ok I cheated here, this is a moving subject/object because it's extended and there was wind.  I held the flower stem with my one hand and took the photo with the other.


I'm not good with videos but will try and put one up.  In the meantime, here's a written version.

Tutorial using Program Mode

Step 1. Make certain your battery(s) are charged, no not a joke because the last thing you want are dead batteries with the only option of charging putting your camera out of action for a few hours. Have extra batteries because the screen will drain them quickly.

Step 2.  Switch your Samsung NX300 on and turn the Mode Dial (refer to the descriptions of your manual if not certain) to P for Program.


Step 3. Before taking a photo you need to check your settings first:
Select Menu and by using the navigation buttons scroll down to select the settings below (will be highlighted in blue), press ok or the right navigation button to open the setting:

Autoshare - I keep this off, you can turn it on later but for this tutorial you don't need to worry about it so leave it off

Photo size - choose size at the highest quality for the best result, 20M (5472 x 3648).  If this option is greyed out it means the Quality has been set to RAW. To change this scroll down to the Quality setting (right beneath Photo Size) and choose Super Fine (which is JPEG).

Quality - Set this to Super Fine as RAW is a bit more complicated.  Good thing about JPEG is that the processing is done in camera, removing artifacts and fringing but you have less information to work with.

ISO - set this to 100 (the lowest setting on the NX300).  Since you will be taking the photo during the day and will have enough light (unless it is overcast but can still be done), you want to keep your ISO as low as possible.  Higher ISO helps to capture more light in a low lit area or overcast day but brings in more noise.  For those experience rainy/overcast days, read to the end about increasing your ISO.

White Balance - later on, as you learn about aperture, shutter speed etc, you will learn about adjusting White Balance and how certain lighting e.g. Halogen Bulbs (some give a yellowish colour cast) can be corrected by changing your white balance.  But for now, leave on AWB (Auto White Balance).

Picture Wizard - leave this Off, it's more for effects as seen in examples below but right now you just want to learn how to take a photo.

Examples of the effects:
Classic

Cool

Retro

AF Mode - Set this to Single Autofocus (AF), which is used for static or still objects/subjects.  With this setting you press the shutter button half way to focus (or touch screen to place focus where you want) then all way to take a photo.  Thing is, if you or your object/subject moves then it/they move out of focus.  You could use Continuous AF which refocuses when it senses the object/subject has moved but for this tutorial set to Single AF.  Manual AF works without the aid of the camera to focus.

AF Area - Set to Multi-AF (selection is by camera whereas Single AF is by the user).  Single AF allows you to select the focus areas but you can still do that with Multi-AF by touching the screen over the area you want to focus on.

Touch AF - Set to Touch AF, which allows you to touch the area you want in focus.  You can also use Tracking AF if your subject/object moves but for this tutorial your subject/object is static.  One Touch Shot eliminates the need to press the shutter button half way and take a photo.  You simply touch the screen where you want the focus and the camera will focus and take a shot.  But for now set to Touch AF.

MF Assist - Meant for manual and fine tuning so either leave this as Off or on Enlarge x5 in case you want to try out manual focusing later on.  I find x5 is enough magnification although you can increase that amount from the options given.

Focus Peaking - Leave this as Off because it's used with manual focusing.

Framing Mode - I prefer to leave this as Off while taking photos during the day.  It would be the equivalent of an Electronic View Finder in Off mode where the screen shows what the camera sees. This means you can see what the exposure is whereas in On mode the camera adjusts the brightness of the screen according to the lighting (if you are in a dark room, it will adjust so you can see what is going on).  But I find it misleading because you can forget that what you are seeing on the screen is not the correct exposure.

Drive - I like to leave this on Continuous High, which makes use of the 8.6 frames per second. Continuous because I like the choice of being able to take one shot or multiple shots.  With Single Shot you can only take one photo at a time.  With Continuous High, depending on how long you hold the shutter button down (and the shutter speed), you can take one or multiple shots.  Continuous Normal only makes use of 5 frames per second (most likely to make clearing the buffer faster).
Just a word of advice, don't hold your shutter button in too long (2-4 shots is good enough) else the buffer fills up and takes time to write to the card.
Burst takes 10 photos per second.  Great for intense action shots but not so great if you want to immediately take more shots afterwards.  It takes about 10 seconds for the buffer to clear after the burst, so use only if you don't need to have the camera ready straight after taking shots.
Timer, AE/WB/P Wiz Bracket are a little more intense and will be discussed later.  Again, as I said, right now you just want to know how to use the Samsung NX300.
So set this to Continuous High.

Metering - Set to Multi which will average the overall brightness of the area.  Spot takes readings of the center (good for backlit subjects/objects) and Center Weighted (good for when there is a difference in lighting between background and foreground) works around Spot.  For now, use Multi.

Dynamic Range - I leave this Off because the lowest ISO allowed is 200 but helps with the loss of detail.  HDR is not available when Continuous Drive is selected, you have to change this to Single Shot in order to use HDR.  For now leave this Off.

Flash - Flash can be used in daylight as a fill flash but leave it off for now.

Step 4.  Now that you have checked your settings let's just get a few points out the way and then start shooting.

Step 5. Choose your object/subject, compose (position how you want the photo to look) and half press the shutter button.  Pay attention to the Aperture number (f number) and the Shutter Speed (something like 1/50 or 1" and to the left of the f number).

The camera will generally choose the settings and you can change the Aperture which will cause the camera to adjust the Shutter Speed accordingly.  Both numbers must stay in the green (green line beneath each) for correct exposure to be achieved.
To change the Aperture (which changes the Shutter Speed), turn the Jog Dial (refer to manual for visual description) on the top.


It has a square on the left side and a magnifying glass on the right.  While turning keep an eye on both numbers until you get the f number to f10.  We are going to start with f10 for the tutorial but in order to lock this you have to half press the shutter button or else the camera will start choosing again.

Step 6 - If the focus isn't where you want it, quickly touch the area on the screen, turn the Jog Dial again to F10 if it has changed (but most likely the NX300 will give you enough time so you may not have to use the Jog Dial) and half press the shutter button to lock everything and all the way down to take a photo.  Remember, don't hold down too long if Drive is set to Continuous High as the camera will carry on taking photos up to the limit (and then slow down) as long as the shutter button is held down.  Learn to get a feel of how long to hold down as the Samsung NX300 responds extremely fast and well.  So you need to know when to let go lol.

On a sunny day the shutter speed should be over 1/50 but if below that you may need a tripod although you can try handheld at as low as 1/30.  Read at the end of the article about what to do on an overcast or rainy day.

Take a photo and check if the lighting is correct, sharpness etc.  If not, try again, refocusing where you want with f10 selected.  If the lighting is too low causing the camera to choose a slower shutter speed because of the aperture, increase your ISO to about 200 or 400 and check shutter speed again. Keep increasing your ISO gradually until your shutter speed is 1/30 and up.

Step 7 - Now start practicing with different apertures, decreasing the number down until the "lowest" number the lens can handle.  This might sound confusing but the smaller the f number the larger the aperture e.g. f2 is larger than f10.  My Samsung 30mm has a starting aperture of f2.  The lower the number, the less will be in focus i.e. the area that the focus point is on will be in focus but surrounding area will start to blur out the smaller the number becomes.

Examples:


f22, shutter 1/30

f10, shutter 1/160

 f2, shutter 1/3200

This is called Depth of Field.  Shallow DOF is a photo with a low f number where only the focus area is sharp and everything else blurred out.  Deep DOF is a higher f number where everything from front to back is in focus.

Take note that as you increase your f number, the blades in the lens close down further and restrict the amount of light that comes in so the shutter needs to be open longer.  That means a slower shutter speed and possible blurring if too slow and handheld.  On a tripod, not problem.

So to summarise, small aperture (bigger f number) = slower shutter speed and larger aperture (smaller f number) = faster shutter speeds.

But if you don't want to decrease your shutter speed, you can increase your ISO.

For example:
Your aperture (f number) is f7.1 and because of low light your shutter speed has slowed down to 2 seconds.  Might not sound like it's slow but it will guarantee you blurred photos handheld.  If you increase your ISO to 200, the time is speed up to one second.  If you increase your ISO to 400, speeds up to 0.5 seconds and so on.  The Samsung NX300 is excellent with noise so experiment.  Just pay attention to the noise (will show up as specks all over the photo).

But what happens if the photo appears too dark?  

That's where Exposure Value Compensation (EV) comes in.

Sorry for the little spotlights, was using another camera that uses macro lights


That set of lines next to the f number allows you to make the photo darker or brighter.  It works differently to Manual Mode but in Program Mode, you press the EV Adjust Button and turn the Jog Dial either left or right.

EV Adjust Button


Press and hold the EV Adjust Button and a blue box will show up around the lines.  Turn the Jog Dial left to darken the exposure or to the right to brighten (before taking a photo).

Examples:

0 EV, no exposure compensation

-0.6 EV, minus exposure compensation makes the photo darker

+0.6 EV, positive exposure compensation makes the photo brighter

The issue you will have with positive exposure compensation is that it will decrease the shutter speed whereas decreasing the brightness (negative exposure) will increase the shutter speed.

If you try to increase your aperture to say f22 and the camera will only allow you to go as high as about f18, then it has decided that there isn't enough light and you will need to increase your ISO to get a higher f number.

What about subjects/objects of different distances? 

When taking a photo you will probably notice there are areas out of focus.  The camera will usually focus on the elements in the foreground or closest to it unless you select focus on something further back.  With a shallow DOF, the area focused on and anything the same distance will usually be in focus as you will see in the examples below.

To get as much in focus as possible use a small aperture (large f number e.g. f10-f22) but pay attention to where the camera places the focus.

The screen might show some areas blurred out before taking a photo even when max aperture is reached e.g. f22.  But don't worry, press the Delete button before taking a photo to see the depth of field and the screen will show what is in focus.  I use this button for another purpose as it can be customized.

If you don't like the areas selected for focus by the camera, touch the screen on where you want the focus.

Examples:

f22, large amount in focus front to back

f10, I chose the focus area on the flower base so anything in front and behind of that is a little out of focus although f10 still provides a large amount of focus

f2, a large amount of the photo is out of focus and again I chose the flower base as the area of focus.  Notice how the tips of the flower are in focus, some areas of the leaves etc.  Those areas are at the same distance as the area of focus.

A larger aperture (small f number, confusing ha?) brings attention to the area of interest and is favoured for portraits, macro or anything where you want specific interest on.  What is also favoured with a large aperture is the bokeh, or pleasantly blurred out background.  Have you seen photos where there are lovely soft circles in the blurred background, for example, behind a person?  That is called bokeh and is created by the aperture blades (that open and close) and will show wherever there is a point of light (natural or false) if a shallow depth of field is used.

The great thing about Bokeh is that you can customize the shape to anything you want.  For an example check out this link http://www.diyphotography.net/diy_create_your_own_bokeh/.

On a rainy or overcast day

If you want to keep your aperture at a certain f number but struggle because of low light issues causing slow shutter speeds, then as said above, increase your ISO.  That or use a tripod.  In order to take a photo with correct exposure the camera needs to draw in more light as the f number gets bigger. So it will slow the shutter speed down to keep the lens open for longer.  If shutter speed is 1 second to 30 seconds and BULB (you choose the amount of time the shutter remains open) then that is referred to as Long Exposure.

But in this tutorial you are working during the day with enough light that you shouldn't go lower than 1 second.

To increase your ISO you can use the Menu button but a quicker way is to press the Fn button or touch the Fn menu on the screen.  Use the navigation buttons to move the blue box (selector) until it has selected the ISO setting and press ok.  Now use the navigation button again to select an ISO.

If you are starting with 100 ISO, increase to 200, then 400 if needed and so on.  Don't be afraid to increase your ISO but get the idea into your head to check on the noise level.

It's all about balance and there isn't a complete formula because each situation and lighting condition is different.  The more you practice and experiment with different lighting, shutter speeds, aperture and ISO the more you will get a feel of what will work for what.  Don't worry, not as difficult or as complicated as you think.

Ok well, that wasn't as quick as I thought but hopefully the article has enough information to get you started.  I will also be going into tutorials with the other modes but it may take time.  As you can imagine this took awhile to put together and I want to be as thorough as possible to make taking photos as easy as possible.

Enjoy and if you have questions, ask.  I will try my best to answer them.

Monday, February 24, 2014

Samsung NX300 Smart Mode: Macro, Action Freeze and Rich Tones

Macro

Macro is my area of interest with photography and after working with a macro lens for years, I was expecting results from this mode.

I'm sorry to say it's not what I would call wow.  I used the Macro Mode and then duplicated the settings in Manual and came up with the same result.  Macro gives a shallow depth of field meaning only a small area is in focus.

Taken with 30mm lens.

The Macro Mode doesn't do you much good if your lens will only let you get so close (unless the lens has macro capabilities).  The 30mm wouldn't let me get closer than around 15cm (if you are measuring from the end of the lens to the object).  But, the 18-55mm has the advantage here because you can get as close as the lens will allow you (in this case around 9cm) and then zoom in.  Below is an example, no editing was done and is straight from the camera in low light.

The Macro feature keeps the aperture at its widest for example, the 30mm's widest aperture is f2.  This allows for more light but also decreases your depth of field, keeping a small area in focus and blurring out the rest.  This area of focus also depends on where you place it.  Take note how the second photo is darker because as you zoom out and your aperture gets smaller you also lose light (your aperture is closing a bit more so less light is allowed in).

For the 18-55mm, the feature keeps the aperture consistent according to the zoom i.e. this lens has an aperture of f3.5-f5.6 so when you are zoomed in at 18mm the feature will select f3.5 and keep it that.  If you zoom out the aperture will change e.g. at 55mm it will be f5.6.  On the 30mm, you will only have f2 available in Macro Mode.

The point is, you cannot change the shutter speed or aperture at any point in the Macro Mode.  ISO is chosen by the camera and in the example above of the rose, the NX300 chose ISO 1600 for low light.  Hardly any noise is visible (me and noise again lol).

Macro mode might be best suited to the Samsung 60mm macro lens.  Even then, why would you need a macro feature if you are using a macro lens?

This might be a draw card for those who have moved from point and shoot cameras that have a Macro feature.  A point and shoot certainly allows you to get closer and I had a chance to play with a Pentax WG-3 camera in Macro Mode.  Now that is impressive if you don't have a macro lens.  I was able to get as close as 1cm and even though there was a bit of softening in the photo, I'd still grab it first for any small details if my 100mm and Canon are not available.

I personally don't see any benefit of this mode, but for those used to the point and shoot method, this is a quick way to get that shallow depth of field without having to fiddle with settings.  But it won't get you closer.  Macro Lenses are not at all cheap and another method is a macro filter or extension tubes.  I think before I would use the Macro Mode I would instead use an extension tube (but I don't know if one exists for the Samsung NX300).

I still would love the 60mm Macro but it's a little out of my budget at present.

As with the other Smart Modes, only JPEG is available and remember that if you change any of the options under the JPEG menu, this also changes the quality option for all the other modes.  Drive is only Single or Timer and I really do miss the continuous option here as I rely on it while working with such fine detail, especially if that detail moves like an insect.

For someone like me who prefers macro lenses, this Macro feature doesn't appeal much to me. But the blurring action does lend some nice artistic ability.  Examples below are taken straight from camera.

Possible egg nest of sorts belonging to a spider.


I have included a short tutorial using Lens Priority with the standard 18-55mm kit lens that I think works better for macro than this feature.  See at the end of the article here: Lens Priority

Action Freeze

Action Freeze would be the equivalent of the Sports Mode on various other cameras.  It speeds up the shutter to freeze whatever is happening but it also pushes up the ISO. Aperture is adjusted and not fixed as with the Macro Mode.

Here the Drive mode includes Single, Continuous High, Continuous Normal, Burst and Timer.  So unlike Macro Mode you have more leverage here and can take multiple shots at once.

The more light you have the better because even though the Samsung NX300 handles noise exceptionally well, you still want to avoid having too much noise.  You don't control the ISO, so keep an eye on what is selected when taking photos.

ISO: 800, Shutter: 1/250, f/5.  It was a slightly overcast day but the camera pushed the ISO up to 800.  While the ducks are slow moving subjects I also used the water fountain for a fast moving object.  If the shutter was slower the water would have been blurred or "smoother".

ISO: 1600, Shutter: 1/250, f5.6.  Water, again.  I cropped in a little closer to give you an idea of how well action freeze works.  You can see the detail in water as it is flowing over the rocks.

Annnnnd...one more water shot.  Sorry but I haven't had time to look for actions shots as yet and water is the next best thing.  This photo was edited but as you can see, the detail captured in the waterfall is amazing.

As Action Freeze is meant for high speed photos, the camera will decide for you.  This also means you have no control and as a well known aviation photographer mentioned to me once, when a plane is in the air, you want to see some movement in the propellers.  The feature will stop the propellers dead. 

This feature will be great for sports shows like car and bike racing.  Hoping to get to a show for a few test shots.

If you were to pair Action Freeze with a macro lens you would be able to capture some fantastic photos of insects in flight, especially if you want to freeze the wings.  The only thing you would have to be careful of is the ISO as high ISO and macro don't gel.  If the camera chose an ISO of 800 or up while you are using the macro lens, you will definitely have noise in the background.  Reduced noise because of the Samsung NX300's performance, but still noise.

All in all a fun feature that will always come in handy for quick action shots.

Rich Tones

Rich Tones, I think, is more orientated towards the HDR (High Dynamic Range) of photos.  Three photos are taken one after another, each with a different exposure.  The first one is underexposed (dark), the second one with correct exposure and the third one overexposed (bright).  These three are then merged in camera to create a photo with a higher range of luminosity than normal photos.  Creates an almost painting like effect with brighter tones.

When you switch to Rich Tones, you will be instructed to hold the camera steady while the three photos are taken so that merging is effortless.  Pay attention to the shutter speed here as a slower shutter speed e.g. 1/50 and under can cause blurring although the camera will increase the ISO to increase speed.  If you do notice that the shutter speed is slow, use a tripod.

While using the mode in different situations I haven't had to use a tripod yet.

Camera again decides on the aperture but it's not set and will change depending on what the camera "sees".  Below I've added a quick example of changing the focus area so that if the camera selects a shallow depth of field you can still change where the selected focus is.

The photos were taken using the Rich Tones feature. The first one I touched the screen to select focus on the tree, which caused the lamp to be blurred out.  The second photo was focused on the lamp, which caused the tree to be blurred out.

As you can see from the photos, the feature tends to wash out the colours somewhat and bring in some unnatural luminosity to the blue sky seen through the parts of the tree.
With a little tweaking of levels, colours and saturation, it looks a little better.


In the photo above the luminosity is enhanced but maybe just a little too much.  Some of the shadow detail is lost and saturation could be brought down a notch.  Again, this is more of a quick photo feature than something you can adjust yourself in camera.  In Lightroom 4, supplied with the Samsung NX300, you can adjust accordingly.

The advantage to having this quick feature is that you don't have to run through the motions in the software to achieve a similar effect.  Just a bit of tweaking here and there and you're done.

Drive is either Single or Timer as the camera needs a few seconds to merge the three photos to produce this effect.  So attempts to take a burst of photos is not possible and this is understandable. Flash is not available for the same reason because the camera's flash would need to activate for each photo and the flash would not be able to keep up plus it would slow the entire process down.


I didn't include the settings above because both are different.  The reason I included the photo is to show the difference in detail.  In the Rich Tones photo, detail in the sky is kept and so is the blue.  But some detail and definition is lost on the body of the propeller making it appear a bit flat.

In the Manual photo you have more definition but all detail is lost in the sky and the colour is bleached to a white.

Taking into editing, I played with both the Rich Tones and Manual photo to see which would produce quicker results that are pleasing.


Similar editing adjustments were used in both photos as well as Topaz Clarity.  The Rich Tones photo has more colour and the clouds have a large amount of detail.  I prefer the colouring in Manual but Rich Tones has more of a HDR effect.

The problem with Manual is that attempting to bring any detail back into the clouds is almost impossible.  My best bet would be to replace the sky in Manual with the sky in Rich Tones, which would have taken time.

The Rich Tones photo was much quicker to adjust with a slightly more pleasing and dramatic result.  Note, this was just a few minutes editing, results would have been better if more time was spent on the photos.

Topaz Clarity enhanced the photo and allowed me to adjust as I chose.  Topaz Clarity is one of my favourite plugins and also works with Lightroom 4.  There are trials available for you to test out at http://www.topazlabs.com/store.

Unedited, Rich Tones.  Just to show that sometimes everything works out nicely.  With a little bit of editing this would work out great.

No feature is ever perfect and each photo is a different situation.  Sometimes it will work and sometimes it won't but there is usually some editing done on every single photo taken to sort out any imperfections.  

Also, the photos of the planes taken above was on an overcast day and I think the Rich Tones feature did well here.  The photos didn't turn out too dark or over exposed so if you are new to SLR, then Rich Tones might end up being one of your favourites for dull days.

HDR can achieve some beautiful results but some pretty terrible ones too.  Rich Tones is a nice feature that can be used to create what I would call a canvas or starting point for something unique.

For some beautiful HDR work and info: http://farbspiel-photo.com/

Wednesday, April 4, 2012

Topaz Labs Bundles

While going through http://farbspiel-photo.com/, the HDR Cookbook the author mentions using Topaz quite a bit. I looked at http://www.topazlabs.com/bundle/ where you can download trials and see how it works for you.

Keep in mind that the files are large so first check the size if bandwidth is a worry for you.

A special ran on St Patrick's Day and it was a pretty big saving for me. I bought the bundle, didn't include Star Effects, which I will get later, but for the price I was happy with my purchase.

The site seems to run specials on a regular basis so keep checking. My favourite is Simplify. It gives a very artistic look to a photo, almost as if the photo was drawn.

Another great tool is the Vignette in Topaz Adjust. I worked through a tutorial, which I will post a link to (trust me these are great tuts) where I needed to use a distort filter that PSE9 didn't have. Now I have a similar tool with Topaz Adjust.

So far I'm impressed with Topaz Labs. Because PSE9 is a watered down version of Photoshop CS5, Topaz Labs has provided that extra bit of flexibility to PSE9. Yes I know, why haven't I upgraded to PSE10?

No real interest since there isn't much of an upgrade in the program worth spending more money on. They apparently fixed the issue with laptops where they failed in PSE9 to tell consumers about the restriction in monitor size. Basically, some options on menus were not available if your monitor size was incorrect (as said they didn't let consumers know this before hand).

Anyway, when it's worthwhile upgrading I'll bother but not right now.